четверг, 19 сентября 2013 г.

FIX: Не запускаются программы (ошибка 0xc0000005) после установки обновления KB2859537 или KB2872339

13 августа Microsoft выпустила обновление KB2859537, и форумы запестрели мольбами о помощи – у людей перестали запускаться программы.
Help  !!!!
Из этой экспресс-записи вы узнаете, как исправить проблему, почему она возникла и как избежать подобных ужасов в будущем.

[+] Сегодня в программе

Назначение обновления KB2859537

tool-kit-icon-96Обновление KB2859537 было призвано исправить четыре уязвимости в ядре Windows, позволяющие несанкционированное повышение прав. Первая уязвимость позволяла загрузить DLL в процесс, обходя механизм защиты ASLR, призванный снизить риск эксплуатации уязвимостей.
Три остальные уязвимости связаны с ошибками в проверке адресов ядром Windows, что приводит к повреждению памяти и позволяет запустить произвольный код в режиме ядра. После этого повышение прав уже не проблема. Технические подробности доступны в бюллетене безопасности MS13-063.

Почему возникла проблема и в чем она заключается

question-96KB2859537 заменяет массу системных файлов, в том числе файлов ядра (полный список есть в статье базы знаний). Если оригинальное ядро было модифицировано, его замена может привести к проблемам.
Upd. 12-Sep-13. Обновление KB2872339, вышедшее в сентябре, заменяет KB2859537, т.е. содержит более новые версии файлов ядра. Его установка может привести к точно таким же проблемам.
У такой модификации есть две наиболее вероятные причины.
Вредоносные программы. Это не первый случай, когда обновление ядра выявляет наличие проблем в системе – так, 3.5 года назад случайно обнаружился руткит Alureon.
Нелегальная активация. Этот момент отлично разобрал участник конференции OSZonesimplix, который не понаслышке знаком со сборками Windows, а также является автором полезной программы AntiSMS для лечения вирусов и троянов.
Позволю себе процитировать его пост в форуме, выделив жирным то, в чем заключается проблема.
Проблема возникает из-за того, что во взломанных системах используется старая версия ntoskrnl.exe, которую патчер (или сборка) переименовывают в xNtKrnl.exe и прописывают в поле kernel через bcdedit. Это нужно для того, чтобы система работала с драйвером, эмулирующим SLIC-таблицу. Старая версия ядра не совместима с новыми файлами подсистемы Wow64, из-за этого в 64-битной системе 32-битные программы перестают запускаться.
Вины Microsoft здесь нет, они просто не тестировали обновления на ломаных сборках. К слову, если пропатчить новую версию ядра, то система будет работать как положено — это означает, что обновление не нацелено на борьбу с пиратскими системами, просто так сложились звёзды.
Кстати, simplix ранее предупреждал читателей блога о возможных проблемах г-сборок, в которых заменяются ресурсы.
Возможны и другие причины — Microsoft в настоящее время исследует их.

Как исправить проблему

fix_itЕсли у вас есть основания полагать, что применение обновления на вашей системе может создать проблему, логично не устанавливать обновление. Правда, при этом вы останетесь с незакрытой уязвимостью ядра.
Оба метода исправления сводятся к откату изменений.

Удаление обновления KB2859537 из командной строки

В командной строке, запущенной с правами администратора, выполните:
1
wusa.exe /uninstall /kb:2859537
Утилита wusa.exe предназначена для установки и удаления обновлений Windows. Запустите ее с ключом /?, чтобы узнать больше.

Откат к точке восстановления системы

Запустите восстановление системы и откатитесь к точке до возникновения проблемы. Если не получается или система не загружается, войдите в среду восстановления Windows 7или Windows 8 и выполните восстановление системы оттуда. И да, эта ситуациюдействительно спасает откат.

Удаление обновления KB2859537 из среды восстановления с помощью DISM

Этот более сложный вариант имеет смысл применять только в том случае, если первыми двумя способами удалить обновление не удалось.
  1. Загрузитесь в среду восстановления Windows 7 или Windows 8.
  2. Запустите командную строку и определите букву диска, на котором установлена Windows.
  3. В командной строке выполните:
    1
    DISM /Image:D:\ /Get-Packages
    где D — буква диска с системой, которую вы определили на предыдущем шаге.
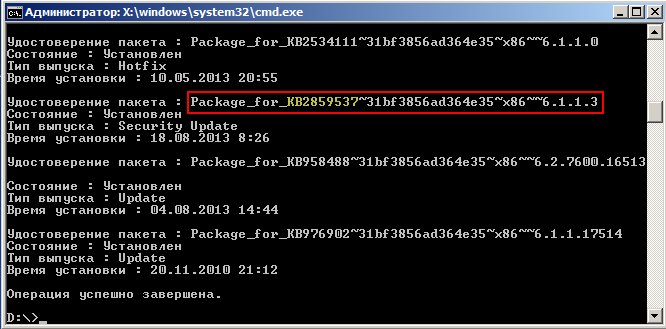
  4. В результатах команды найдите пакет, содержащий в названии KB2859537. На рисунке имя пакета показано исключительно для примера.
    remove-KB2859537-dism
    Увеличить рисунок
  5. Выделите имя пакета левой кнопкой мыши и нажмите правую кнопку мыши, чтобы скопировать его в буфер обмена.
  6. В командной строке наберите:
    2
    DISM /Image:D:\ /Remove-Package /PackageName:
    и нажмите правую кнопку мыши, чтобы вставить имя пакета. Должна получиться примерно такая команда:
    3
    DISM /Image:D:\ /Remove-Package /PackageName:Package_for_KB2859537~31bf3856ad364e35~x86~~6.1.1.3
  7. Нажмите Enter, чтобы выполнить команду и удалить пакет.
Примечание. В случае успешного удаления, KB2859537 исчезнет из списка установленных обновлений в панели управления. Однако в журнале установленных обновлений оно будет присутствовать, поскольку установка производилась.

Как не допустить возникновения проблемы в будущем

clipboardcheck-96Поняв причину неурядиц, нетрудно догадаться, как их избежать.

Обеспечьте защиту от вирусов

Буквально на этой неделе я открыл в блоге обсуждение на тему того,можно ли работать в Windows без антивируса!

Избегайте г-сборок и активаторов

Надеюсь, вы оцените точность формулировки :) Обязательная ссылка: Super Mega Zver Black eXtreme 2013 Edition.

Обратитесь в техническую поддержку

Владельцы лицензионных систем, столкнувшиеся с проблемой, просто обязаны обратиться в техподдержку, чтобы Microsoft осознала наличие и масштаб проблемы. Обладателям ПК с предустановленной Windows следует обращаться в поддержку производителя устройства, который в свою очередь донесет информацию до сведения Microsoft.
Всем, кто приобрел Windows отдельно, Microsoft оказывает бесплатную техподдержку при проблемах после установки обновлений. Вы можете обратиться в компанию с 8 утра до 8 вечера в будни и с 10 утра до 7 вечера в субботу по бесплатному номеру:
  • Россия: 8 (800) 200-8001
  • Украина: 0 (800) 308-800
  • Беларусь: 8 (820) 0071-0003
Вы также можете обратиться за бесплатной поддержкой по электронной почте. Перейдите на эту страницу, а затем последовательно выберите операционную систему, издание и раздел поддержки:
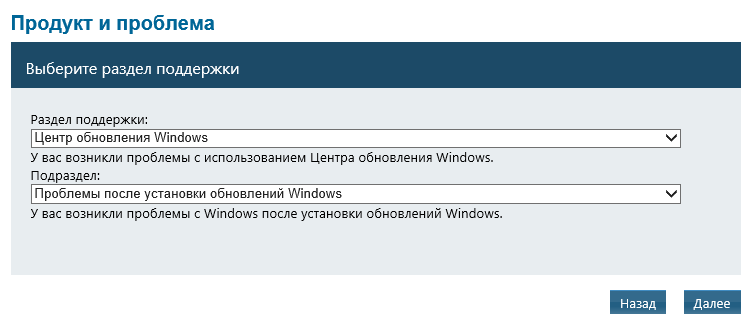
После этого вы увидите варианты поддержки, одним из которых является отправка письма посредством формы на сайте.

суббота, 31 августа 2013 г.

HTTP Redirection in IIS 7 on Windows Server 2008

If you have a website and want to change domain names or if you need to change the architecture of your site, you won’t want visitors following links from other sites and search engines such as Google to get an error while visiting your website. This can cause visitors to click away and a loss of rankings in the search engines.
Luckily there is a fairly simple and straightforward way to remedy the situation through the use of redirects. First, let’s look at the different types of redirects that are available in IIS 7:
  • 301 – Permanent: This redirect tells the Web client that the location of the requested resource has moved permanently
  • 302 – Standard: This redirect tells the Web client to issue a new request to the location specified
  • 307 – Temporary: This redirect tells the Web client to resend POST data, which prevents a Web browser from losing data when the browser issues an HTTP POST request
In most circumstances you will want to use a 301 redirect, as this will inform search engines to update their index with the resource’s new location. In some cases a 302 will be appropriate if the change is going to be short term such as a special page that is seasonal.
For this article I will assume that you already have a site setup on a Windows Server 2008 system setup in a web server role, and are familiar with getting into IIS manager.

Redirect to a Different URL

The first and most simple of the redirects will go from one domain to another, useful if you are changing domain names. I have setup the following two domains TSOriginal.com andTSRedirect.com on my test server as you can see:
IIS 7 Redirection - 1
As you can see, we setup the original domain as TSOriginal.com and have put a simple index.html file in place that looks like this:
IIS 7 Redirection - 2
Now let’s walk through the steps required to setup a redirect to our target domainTSRedirect.com. If it works correctly then we should see the new index.html page below:
IIS 7 Redirection - 3
1. Open IIS Manager by going to Start -> Administrative Tools -> IIS Manager
IIS 7 Redirection - 4
2. Once IIS Manager opens, expand the WebServer, then the Sites folder, and choose the domain, in this case TSOriginal.com.
IIS 7 Redirection - 5
3. Click on HTTP REDIRECT in the main panel
IIS 7 Redirection - 6
4. Place a check next to Redirect requests to this destination: and fill in the target url in the text box below. In this instance it will be TSRedirect.com.
IIS 7 Redirection - 7
5. In the Redirect Behavior we have several decisions to make about how we want the redirects to work. Let’s explore each of these options.
  • Redirect all requests to exact destination – If this object is checked all requests no matter what the original destination will be redirected to the exact location in the text box above. If unchecked everything will be redirected relative to the destination.
  • Only redirect requests to content in this directory (not subdirectories) – By default, when you enable redirection, content can be served by subdirectories below the main directory. If you choose this option you can limit requests to just the directory you want without effecting the subdirectories.
  • Status Code – In this drop down you choose which status code to return when redirecting. As discussed earlier in this article your options are 301, 302, and 307.
6. For this example we will leave everything unchecked and set a status of 301 in the dropdown menu. Click Apply to set the options.
IIS 7 Redirection - 8
7. The changes are now in place and if we navigate to TSOriginal.com it will redirect us to TSRedirect.com.
To test if the 301 status redirects correctly we will use the live HTTP headers plugin for Firefox. It will allow us to see the status codes. Here are the results for the test:
IIS 7 Redirection - 9
As you can see from the highlighted area the status was returned 301.
All requests now for TSOriginal.com will be sent to TSRedirect.com with a 301 status code relative to the domain name.

Redirect a Single Page to Another Page on the Same Site

This type of redirect is especially useful when you might have some temporary changes to a webpage because of seasonal or holiday changes.
In the case of a seasonal page that will return to normal after a short time, it is best to use a 302redirect. This lets search engines and other sites know that this change is expected and not to change their index or links.
For this example we have removed the site redirect we had placed on TSOriginal.com, and added two pages of content to the site:
oldpage.html
IIS 7 Redirection - 10
newpage.html
IIS 7 Redirection - 11
Now let’s setup a temporary 302 redirect from oldpage.html to newpage.html while.
1. Select the site in IIS manager that you want to set the redirect for.
2. In the Features window switch to Content View, Right click on the page you want to work with, oldpage.htm in this case, and left click on Switch to Features View
IIS 7 Redirection - 12
3. The page now selected in the Connections Pane, click on HTTP Redirect in the features pane
IIS 7 Redirection - 13
4. Check the box next to Redirect requests to this destination, and fill in the destination pagenewpage.htm and set the dropdown menu to 302, and click Apply.
IIS 7 Redirection - 14
5. Now if we navigate to the page TSOriginal.com/oldpage.htm we will be redirected toTSOriginal.com/ newpage.htm.
We will again use the Live HTTP Headers plugin for Firefox to view the redirect. As you can see the pages redirect with the correct 302 status code.
IIS 7 Redirection - 15
You are now ready to do basic redirects in IIS 7 on Windows 2008 server.
These redirects can also be setup using Appcmd.exe at the command line, but this is beyond the scope of this article. If you’re interested check out the Live HTTP plug-in for Firefox.

The log or differential backup cannot be restored because no files are ready to rollforward.

If you have found this page, it is likely that you encountered the following error when you tried to restore a differential backup using Microsoft SQL Server 2005. Restore failed for Server ''. (Microsoft.SqlServer.Smo) Additional Information:System.Data.SqlClient.SqlError: The log or differential backup cannot be restored because no files are ready to rollforward. (Microsoft.SqlServer.Smo) What this error is telling you is that there is no database that was left in non-operational mode, and thus has not been cleaned up such that uncommitted transactions have not been rolled back. The easy way to reproduce this error is to backup your database using full recover model, and do full and differential backups. Once you have your full and differential backup files you, if you want to restore your database all you have to do is restore the full backup first, and then one of the differential files (differential backups have all the changes since the last full backup) that brings you up to the point you want to restore to. You will get the above error when you try to restore the differential backup (after you just restored the full backup). Unfortunately, you forgot one critical detail (just like I did at first). You MUST restore all but the last (in this case the full backup) with NORECOVERY option. In the Microsoft SQL Server Management Studio there are three options on the Option "page" when you restore a database. Option 1 (the default): Leave the database ready to use by rolling back uncommitted transactions. Additional transaction logs cannot be restored.(RESTORE WITH RECOVERY) Option 2: Leave the database non-operational, and do not roll back uncommitted transactions. Additional transaction logs can be restored.(RESTORE WITH NORECOVERY) To properly restore a database that is backup up using full recovery mode with full and differential backups, here are the steps you need to follow to not get the above error. Restore Full backup
  1. Open the Restore Database window in Microsoft SQL Server Management Studio
  2. Ensure the To database field is filled in with the name you want.
  3. Choose From device as the Source for restore.
  4. Choose the full backup file you want to restore. In most cases this is the most recent full backup file.
  5. Click the Options page on the left navigation.
  6. Choose Leave the database non-operational, and do not roll back uncommitted transactions. Additional transaction logs can be restored.(RESTORE WITH NORECOVERY). This is the most important step!!!
Restore Differential backup
  1. Open the Restore Database window in Microsoft SQL Server Management Studio
  2. Ensure the To database field is filled in with the name you want. The same that you specified in step 2 for the Restore Full backup
  3. Choose From device as the Source for restore.
  4. Choose the differential backup file you want to restore. In most cases this is the most recent differential backup file.
  5. Click the Options page on the left navigation.
  6. Choose the default: Leave the database ready to use by rolling back uncommitted transactions. Additional transaction logs cannot be restored.(RESTORE WITH RECOVERY) Make sure to choose this if you want to use your database after the restore.
That is it, no more error. If you are lucky :)

Automated differential backup using 7zip for linux/windows

There are a lot of ways of doing differential backups, tons of software, freeware of shareware. I want to share one I didn't know about which I liked very much. It is unfair so little information can be found the Net about 7-zip archival tool, which can handle differential backups with ease.  Article is for CLI geeks, who understands where to push these commands )

What are Differential and Incremental backups?

Incremental backup

is a backup method in which multiple backups are kept (not just the last one). These backups will be incremental if each original piece of backed up information is stored only once, and then successive backups contain only the information that changed since a previous backup.

Differential backup

is a cumulative backup of all changes made since the last full or normal backup, i.e., the differences since the last full backup
I am talking about Differential backup, which contains one FULL archive and several DIFFERENTIAL archives on different date each.

Using 7zip for automated backup

Is really great tool for archiving files. Linux and win32 platform support, crossplaform archiving, multi threading support.

7zip installation

  1. Windows, download
  2. Ubuntu: aptitude install p7zip

7zip commands to create a backup of files

First step is to create full backup which is fairly easy:
7za a c:\archive.7z  c:\folder_to_archive
Next is to create differential backup with name diff1.7z
7za u c:\archive.7z  c:\folder_to_archive  -ms=off -mx=9 -t7z -u- -up0q3r2x2y2z0w2!c:\diff1.7z
  • Where command switches stand for:
  • -mx=9 - best compression
  • -t7z - 7z archive type
Wtf "-up0q3r2x2y2z0w2!c:\diff1.7z" is ?
Actions mask to determinite 7z behavior
p - File exists in archive, but is not matched with wildcard.
q - File exists in archive, but doesn't exist on disk.
r - File doesn't exist in archive, but exists on disk.
x - File in archive is newer than the file on disk.
y - File in archive is older than the file on disk.
z - File in archive is same as the file on disk
w - Can not be detected what file is newer (times are the same, sizes are different)
Number means action:
0 Ignore file (don't create item in new archive for this file)

1 Copy file (copy from old archive to new)

2 Compress (compress file from disk to new archive)

3 Create Anti-item (item that will delete file or directory during extracting). This feature is supported only in 7z format
More detailes on this switch here:

How to extract files from 7zip differential backup

First step is to extract full backup  archive:
7za.exe x c:\archive.7z -oc:\recovery_path\
Next,  to extract needed differential  backup on top to the same folder
7za.exe x c:\archive.7z -aoa -y -oc:\recovery_path\
-aoa Overwrite All existing files without prompt.
-y (assume Yes on all queries) switch
After extraction destination folder will contain exact structure and files on date of backup!

What is 7zip anti-item

When creating differential archive 7zip matches files that have been deleted and creates anti-file entry which tells 7zip extractor actually do delete file when overriding master archive. Thats why resulting recovery folder will look the same as on archiving stage.

7zip backup limitations

DO NOT USE the 7-zip format on Linux/Unix  for system backup purposes, because of 7zip does not store the owner/group of the file.
On Linux/Unix, in order to backup directories you should use tar
to backup a directory
tar cf – directory | 7za a -si directory.tar.7z
to restore your backup :
7za x -so directory.tar.7z | tar

SQL Server Full Backups

OverviewThe most common types of SQL Server backups are complete or full backups, also known as database backups.  These backups create a complete backup of your database as well as part of the transaction log, so the database can be recovered. This allows for the simplest form of database restoration, since all of the contents are contained in one backup.
ExplanationA full backup can be completed either using T-SQL or by using SSMS.  The following examples show you how to create a full backup.

Create a full backup of the AdventureWorks database to one disk file
T-SQL
BACKUP DATABASE AdventureWorks TO DISK = 'C:\AdventureWorks.BAK'
GO
SQL Server Management Studio
  • Right click on the database name
  • Select Tasks > Backup
  • Select "Full" as the backup type
  • Select "Disk" as the destination
  • Click on "Add..." to add a backup file and type "C:\AdventureWorks.BAK" an click "OK"
  • Click "OK" again to create the backup

SQL Server Differential Backups

OverviewAnother option to assist with your recovery is to create "Differential" backups.  A "Differential" backup is a backup of any extent that has changed since the last "Full" backup was created.
ExplanationThe way differential backups work is that they will backup all extents that have changed since the last full backup.  An extent is made up of eight 8KB pages, so an extent is 64KB of data.  Each time any data has been changed a flag is turned on to let SQL Server know that if a "Differential" backup is created it should include the data from this extent.  When a "Full" backup is taken these flags are turned off.
So if you do a full backup and then do a differential backup, the differential backup will contain only the extents that have changed.  If you wait some time and do another differential backup, this new differential backup will contain all extents that have changed since the last full backup.  Each time you create a new differential backup it will contain every extent changed since the last full backup.  When you go to restore your database, to get to the most current time you only need to restore the full backup and the most recent differential backup.  All of the other differential backups can be ignored.
If your database is in the Simple recovery model, you can still use full and differential backups. This does not allow you to do point in time recovery, but it will allow you to restore your data to a more current point in time then if you only had a full backup.
If your database is in the Full or Bulk-Logged recovery model you can also use differential backups to eliminate the number of transaction logs that will need to be restored.  Since the differential will backup all extents since the last full backup, at restore time you can restore your full backup, your most recent differential backup and then any transaction log backups that were created after the most recent differential backup.  This cuts down on the number of files that need to be restored.

Create a differential backup of the AdventureWorks database to one disk file
T-SQL
BACKUP DATABASE AdventureWorks TO DISK = 'C:\AdventureWorks.DIF' WITH DIFFERENTIAL
GO
SQL Server Management Studio
  • Right click on the database name
  • Select Tasks > Backup
  • Select "Differential" as the backup type
  • Select "Disk" as the destination
  • Click on "Add..." to add a backup file and type "C:\AdventureWorks.DIF" and click "OK"
  • Click "OK" again to create the backup