In many applications, there are certain tasks that you perform frequently. Some of those tasks include opening files, saving files, printing files, and so on. Because a lot of these tasks do not vary among applications and require some level of OS-level hacking, Windows provides built-in functionality and a consistent UI for performing these tasks for you. You commonly use them in the form of dialog windows.
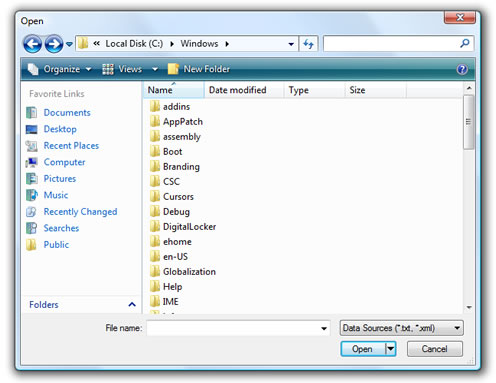
In this tutorial, I will explain how to use one such dialog window known as Open File. The Open File dialog window is what you see when you, for example, go to File | Open in most applications:
[ the Open File dialog window in Vista ]
To maintain consistency, it is better for you to use the same Open File dialog window in your applications to provide open file functionality, and you'll learn how to do that and more in this tutorial. The final section of this tutorial is dedicated to address a WPF issue that displays the wrong version of the Open File dialog window in Vista.
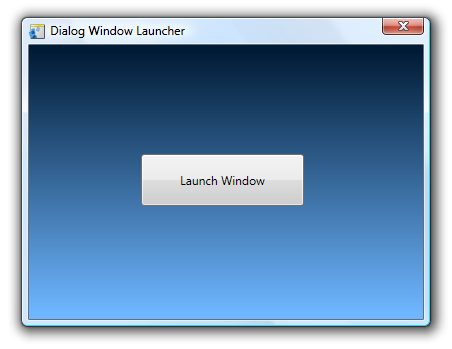
Instead of having you spend time creating your own application, I have provided a very simple application consisting of a button to which you will add some code to for testing/displaying your dialog window:
[ your sample application ]
So, first,
download and extract the source files used for creating the sample application shown above:
[ your recently extracted files ]
Once you have extracted the files, open this project using Visual Studio or the free Visual C# Express. I'll be using Visual C# Express for this tutorial.
With your project now opened, open Window1.xaml.cs. You will see the following code displayed:
- using System;
- using System.IO;
- using System.Net;
- using System.Windows;
- using System.Windows.Controls;
- using System.Windows.Data;
- using System.Windows.Media;
- using System.Windows.Media.Animation;
- using System.Windows.Navigation;
- using Microsoft.Win32;
-
- namespace DialogTest1
- {
- public partial class Window1
- {
- public Window1()
- {
- this.InitializeComponent();
-
- // Insert code required on object creation below this point.
- }
-
- private void WindowLauncher(object sender, RoutedEventArgs e)
- {
-
- }
- }
- }
The WindowLauncher event handler method is what gets called when the button in your application is pressed. In the following sections, you'll add code to your WindowLauncher method to display your Open File dialog window.
The Open File dialog window provides an Explorer-like view for navigating through your files and selecting a file for you to open. What is returned after your journey through the Open File dialog window is the path to the file you selected.
To use this dialog window, you use the OpenFileDialog class. Copy and paste the following two lines into your WindowLauncher method:
- private void WindowLauncher(object sender, RoutedEventArgs e)
- {
- OpenFileDialog ofd = new OpenFileDialog();
- ofd.ShowDialog();
- }
Once you have added the above two lines to your WindowLauncher method, run your application by press F5. Click on your Launch Window button to see your Open File dialog appear.
If you look at our code, we declare an OpenFileDialog object called ofd. We then call ofd's ShowDialog() method:
- ofd.ShowDialog();
When you use the ShowDialog() method, you are launching a window that is modal. A modal window borrows focus from your entire application to itself. You will be unable to access the window that spawned the modal window until your modal window is closed.
One of the primary functions of your Open File dialog window is to return the path of the file you selected. To retrieve the path of the selected file, replace the code inside your WindowLauncher with the following code:
- private void WindowLauncher(object sender, RoutedEventArgs e)
- {
- OpenFileDialog ofd = new OpenFileDialog();
-
- if (ofd.ShowDialog() == true)
- {
- string filePath = ofd.FileName;
- string safeFilePath = ofd.SafeFileName;
- }
- }
This time, if you select a file by double-clicking on it or by selecting it and pressing your Open button, the file's name is stored in two variables called filePath and safeFilePath. Before we get to the file names itself, notice how I check to make sure that a file has been specified for opening:
- if (ofd.ShowDialog() == true)
- {
- string filePath = ofd.FileName;
- string safeFilePath = ofd.SafeFileName;
- }
Your ShowDialog() method returns an object of type bool? which is a nullable boolean. A nullable boolean returns a value that is true, false, and a third type that is null. If you select a file for Open, your ShowDialog method returns true. If you click Cancel or close your Open File dialog window, the value is false.
Since we are interested in dealing with the result of a file that is specified for opening, we only check the true property. Now, let's look at our filePath and safeFilePath variables:
- string filePath = ofd.FileName;
- string safeFilePath = ofd.SafeFileName;
The filePath variable gets its data by accessing ofd's FileName property, and safeFilePath gets its data by accessing ofd's SafeFileName property. Your FileName is the full path to your file plust your file's name and extension. The SafeFileName returns just the name of your file and its extension. The path is not returned.
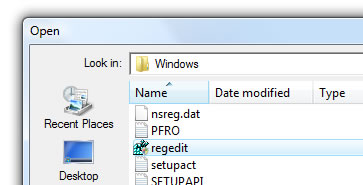
For example, let's say you decide to open a file located in your C:\Windows path called regedit:
[ opening a file using the Open File dialog window ]
When you select that file for opening, your FileName will be C:\Windows\regedit.exe, and your SafeFileName will be regedit.exe. Depending on what you are doing, you will need to decide whether you want to use FileName or SafeFileName.
You can tailor your Open File dialog window to actually select multiple files if needed. The following code shows you how:
- private void WindowLauncher(object sender, RoutedEventArgs e)
- {
- OpenFileDialog ofd = new OpenFileDialog();
- ofd.Multiselect = true;
-
- if (ofd.ShowDialog() == true)
- {
- string[] filePath = ofd.FileNames;
- string[] safeFilePath = ofd.SafeFileNames;
- }
- }
There are only two main changes when you want to select multiple files. The first change is that you need to set your OpenFileDialog object's Multiselect property to true:
- ofd.Multiselect = true;
With Multiselect set to true, you are now able to select multiple files. With multiple files, though, you cannot store the data in a single string variable like you did for the single file case earlier. This brings us to our next change where the values returned by your dialog window are stored in an array:
- string[] filePath = ofd.FileNames;
- string[] safeFilePath = ofd.SafeFileNames;
Notice that both filePath and safeFilePath now store an array of strings. Also, instead of using FileName and SafeFileName to store the full path and file name, you use the plural form - FileNames and SafeFileNames.
Another cool Open File dialog window is learning how to filter the files you see based on the file extension. Right now, your application doesn't filter based on any extensions:
[ currently you are not filtering by extensions ]
To filter by file extensions, you use your OpenFileDialog's aptly named Filter property:
- private void WindowLauncher(object sender, RoutedEventArgs e)
- {
- OpenFileDialog ofd = new OpenFileDialog();
- ofd.Multiselect = true;
-
- ofd.Filter = "Data Sources (*.txt, *.xml)|*.txt*;*.xml|All Files|*.*";
-
- if (ofd.ShowDialog() == true)
- {
- string[] filePath = ofd.FileNames;
- string[] safeFilePath = ofd.SafeFileNames;
- }
- }
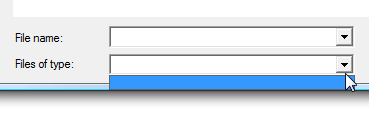
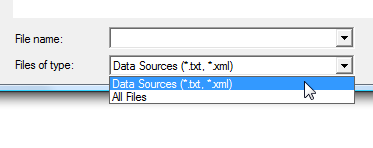
When you run your application this time, notice that you can now filter based on Data Sources and All Files:
[ you now filter by Files of type ]
To specify your own filters, you need to provide the filter's description and the extension. The syntax you use to you specify the filter is a little weird, so let's look at the approach I used to specify my Data Sources and All Files filters:
- ofd.Filter = "Data Sources (*.txt, *.xml)|*.txt*;*.xml|All Files|*.*";
The basic format is Description 1|*.ext1;*.ext2|Description 2|*.ext1;*.ext2" You separate the description and the extension(s) using the | character. If you are using multiple extensions, you separate each of them using a semicolon, and note that each extension must be preceded by the * wildcard character.
If you take a close look at the OpenFileDialog under Windows Vista, you'll find that it looks out of place with its old-school style and low quality icons:
[ the old-school Open File dialog window ]
This is actually not a feature. To display the proper OpenFileDialog in Windows Vista and earlier versions, one solution is to call the WinForms version of OpenFileDialog. To do that, first you will need to add a reference to System.Windows.Forms. From your Solution Explorer in Visual Studio / C# Express, right click on the References folder and select Add Reference:
[ we need to add a reference to your project ]
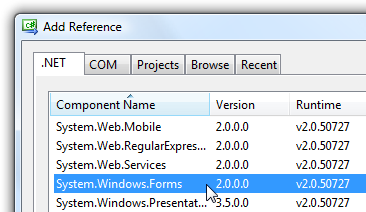
After you have selected the Add Reference menu item, the Add Reference window will appear. From this window, make sure the .NET tab is selected. Scroll down until you find the System.Windows.Forms Component Name:
[ let's add the System.Windows.Forms namespace ]
Select System.Windows.Forms and press OK to add the reference to this component and to close the Add Reference window.
Now that your reference has been added, we need to add a new using statement to get our C# file to use components stored in System.Windows.Forms. In your Window1.xaml.cs file (which should be open anyway), add the System.Windows.Forms namespace to your list of using statements:
- using System;
- using System.IO;
- using System.Net;
- using System.Windows;
- using System.Windows.Controls;
- using System.Windows.Data;
- using System.Windows.Media;
- using System.Windows.Media.Animation;
- using System.Windows.Navigation;
- using Microsoft.Win32;
- using System.Windows.Forms;
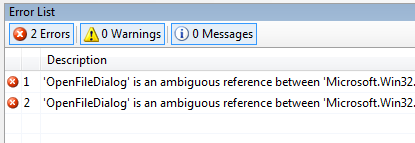
After you have added your new using statement, press F6 to build your application. You will notice that you now receive a few errors:
[ two errors now appear because of an incompatibility ]
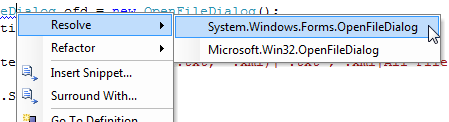
The errors are caused because the OpenFileDialog class exists in both your Microsoft.Win32 namespace as well as you newly added System.Windows.Forms namespace. To resolve this problem, right click on each instance of the OpenFileDialog class in your code, select Resolve, and from the next menu, select System.Windows.Forms.OpenFileDialog:
[ select your OpenFileDialog window ]
You'll need to repeat the above process for each OpenFileDialog instance that exists in your code. For example, this is how my code now looks like:
- private void WindowLauncher(object sender, RoutedEventArgs e)
- {
- System.Windows.Forms.OpenFileDialog ofd = newSystem.Windows.Forms.OpenFileDialog();
- ofd.Multiselect = true;
-
- ofd.Filter = "Data Sources (*.txt, *.xml)|*.txt*;*.xml|All Files|*.*";
-
- if (ofd.ShowDialog() == true)
- {
- string[] filePath = ofd.FileNames;
- string[] safeFilePath = ofd.SafeFileNames;
- }
- }
Notice that OpenFileDialog object declaration and initialization explicitly maps out the path through System.Windows.Forms to avoid the ambiguity that exists with the similar OpenFileDialog that exists in Microsoft.Win32.
When you build your application again, you'll run into another error. This time, our earlier code where we check if our dialog window returns a true for opening a file no longer works. In the WinForms version of OpenFileDialog, you'll need to explicitly select your dialog window's OK button as having been pressed, and you can do that via the WinForms DialogResult enum:
- private void WindowLauncher(object sender, RoutedEventArgs e)
- {
- System.Windows.Forms.OpenFileDialog ofd = newSystem.Windows.Forms.OpenFileDialog();
- ofd.Multiselect = true;
-
- ofd.Filter = "Data Sources (*.txt, *.xml)|*.txt*;*.xml|All Files|*.*";
-
-
- if (ofd.ShowDialog() == System.Windows.Forms.DialogResult.OK)
- {
- string[] filePath = ofd.FileNames;
- string[] safeFilePath = ofd.SafeFileNames;
- }
- }
Notice that instead of checking if ShowDialog returns true, I check to see if it was the OK button that was used to close the dialog window. If you build and run your application again, you will not receive any errors. If you are running a non-Vista version of Windows, you'll display the usual Open File dialog window, but if you are running Vista, you will see the more native Open File dialog window instead:
[ the correct, proper version of the Open File dialog window ]
A valid question would be to ask why the Win32 version should even be used when dealing with dialog windows. The main reason is that all dialog windows including the Windows.Forms versions, internally call the same lower level implementation of the dialog window. Ideally, it should not matter whether you create your OpenFileDialog object using the Win32 namespace or the Windows.Forms namespace. The end result should be that the best version of the dialog window that can be displayed by your OS should be displayed.
I believe that future versions of WPF will fix this inconsistency, so hopefully you will not have to create this workaround using Windows.Forms inside a WPF application in the future. A fix would automatically cause any WPF applications that use the currently-incorrect Win32 calls to automatically display the new version. If you are willing to risk the wait, you can use the default Win32 approach and automatically display the new windows when the fix is made. If you want to provide a good UI now, you can make the call to the dialog window using Windows.Forms as described in this page.