Introduction
How do we run scheduled jobs from ASP.NET without requiring a Windows Service to be installed on the server? Very often, we need to run some maintenance tasks or scheduled tasks like sending reminder emails to users from our websites. This can only be achieved using a Windows Service. ASP.NET being stateless provides no support to run code continuously or to run code at a scheduled time. As a result, we have to make our own Windows Services to run scheduled jobs or cron jobs. But in a shared hosted environment, we do not always have the luxury to deploy our own Windows Service to our hosting provider's web server. We either have to buy a dedicated server which is very costly, or sacrifice such features in our web solution. However, running a scheduled task is a very handy feature, especially for sending reminder emails to users, maintenance reports to administrators, or run cleanup operations, etc. I will show you a tricky way to run scheduled jobs using pure ASP.NET without requiring any Windows Service. This solution runs on any hosting service providing just ASP.NET hosting. As a result, you can have the scheduled job feature in your ASP.NET web projects without buying dedicated servers.
How it works
First, we need something in ASP.NET that is continuously running and gives us a callback. The IIS web server is continuously running. So, we somehow need to get a frequent callback from it so that we can lookup a job queue and see if there's something that needs to be executed. Now, there are several ways a web server comes to us:
- When a page hits
- When an application starts
- When an application stops
- When a session starts and ends/timeouts
- When a cache item expires
The page hit is random. If nobody visits your website for hours, you can't do the pending jobs for hours. Besides, the execution of a request is very short and needs to finish as soon as possible. If you plan to execute scheduled jobs on page execution, then the page will take longer to execute, which will result in a poor user experience. So, clearly this is not an option.
When an application starts, we get a callback in the
Application_Start method of Global.asax. So, this is a good place to start a background thread which runs forever and executes scheduled jobs. However, the thread can be killed anytime the web server decides to take a nap due to zero load.
When an application stops, we get a callback at
Application_End. But we can't do anything here because the whole application is going to die soon.Session_Start in Global.asax is triggered when a user visits a page that requires a new session to be initiated. So, this is also random. We need something that fires consistently and periodically.
A cache item expires on a given time or duration. In ASP.NET, you can add entries in the
Cache and set an absolute expiry date time, or you can set a duration after which the item is removed from the cache. You can do this by utilizing the following method of the Cache class:public void Insert ( System.String key , System.Object value ,
System.Web.Caching.CacheDependency dependencies ,
System.DateTime absoluteExpiration ,
System.TimeSpan slidingExpiration ,
System.Web.Caching.CacheItemPriority priority ,
System.Web.Caching.CacheItemRemovedCallback onRemoveCallback )
The
onRemoveCallback is a delegate to a method which is called whenever a cache item expires. In that method, we can do anything we like. So, this is a good candidate for running code periodically, consistently without requiring any page visit.
This means, we can simulate a Windows Service utilizing Cache timeout! Now, who thought that this would be possible?
Creating cache item callbacks
First, on
Application_Start, we need to register a cache item that will expire in two minutes. Please note, the minimum duration you can set for expiring a callback is two minutes. Although you can set a lower value, it does not work. Most probably, the ASP.NET worker process looks at the cache items once every two minutes.private const string DummyCacheItemKey = "GagaGuguGigi";
protected void Application_Start(Object sender, EventArgs e)
{
RegisterCacheEntry();
}
private bool RegisterCacheEntry()
{
if( null != HttpContext.Current.Cache[ DummyCacheItemKey ] ) return false;
HttpContext.Current.Cache.Add( DummyCacheItemKey, "Test", null,
DateTime.MaxValue, TimeSpan.FromMinutes(1),
CacheItemPriority.Normal,
new CacheItemRemovedCallback( CacheItemRemovedCallback ) );
return true;
}
This cache entry is a dummy entry. We do not store any valuable information here because whatever we store here might be gone on application restart. Besides, all we need is the frequent callback from this item.
Inside the callback, we do all the service work:
public void CacheItemRemovedCallback( string key,
            object value, CacheItemRemovedReason reason)
{
    Debug.WriteLine("Cache item callback: " + DateTime.Now.ToString() );

    // Do the service works

    DoWork();
}
Store item in cache again upon expire
Whenever the cache item expires, we get a callback and the item is gone from the cache. So, we no longer get any callback in future. In order to have a continuous supply of callback, we need to store an item in cache again upon expiration. This seems quite easy; we can call the
RegisterCacheEntry function shown above from the callback function, can't we? It does not work. When the callback method fires, there is no HttpContext available. TheHttpContext object is only available when a request is being processed. As the callback is fired from the web server behind the scene, there is no request being processed and thus no HttpContext is available. As a result, you cannot get access to the Cache object from the callback function.
The solution is, we need to simulate a request. We can make a dummy call to a dummy webpage by utilizing the
WebClient class in the .NET Framework. When the dummy page is being executed, we can get hold of theHttpContext and then register the callback item again.
So, the callback method is modified a bit to make the dummy call:
public void CacheItemRemovedCallback( string key,
            object value, CacheItemRemovedReason reason)
{
    Debug.WriteLine("Cache item callback: " + DateTime.Now.ToString() );

    HitPage();

    // Do the service works

    DoWork();
}
The
HitPage function makes a call to a dummy page:private const string DummyPageUrl =
"http://localhost/TestCacheTimeout/WebForm1.aspx";
private void HitPage()
{
WebClient client = new WebClient();
client.DownloadData(DummyPageUrl);
}
Whenever the dummy page executes, the
Application_BeginRequest method gets called. There, we can check whether this is a dummy page request or not.protected void Application_BeginRequest(Object sender, EventArgs e)
{
// If the dummy page is hit, then it means we want to add another item
// in cache
if( HttpContext.Current.Request.Url.ToString() == DummyPageUrl )
{
// Add the item in cache and when succesful, do the work.
RegisterCacheEntry();
}
}
We only intercept the request to the dummy page, and we let other pages execute as it is.
Restart cache item callback on web process restart
There are several cases where the web server might be restarted. For example, if the Administrator restarts IIS, or restarts the computer, or the web process gets recycled (Windows 2003). In such cases, the service will stop running unless a page is hit and the
Application_Start is called. Application_Start is called only when a page is visited for the first time in a web project. So, when the web process is restarted, we need to manually call the dummy page, or someone needs to visit the home page of your website, in order to get the service running again.
One tricky solution to this problem can be adding your website to search engines. Search engines crawl pages frequently. So, they will hit a page of your website, resulting in
Application_Start, and thus the service will get up and running.
Another idea is to register your website to some traffic or availability monitoring services. There are lots of Web Services which keep an eye on your website and checks whether it is alive and the performance is satisfactory. All these services hit your web site pages and then collect the statistics. So, by registering in such services, you can guarantee your web application is alive all the time.
Testing possible types of job executions
Let's test whether we can do all possible tasks that we can do from a Windows Service. The first problem is, we cannot do everything a Windows Service does because it runs in the Local System account. This is a very high privilege account, and you can do anything to your system under this account. However, the ASP.NET web process runs in the ASPNET account (Windows XP) or NETWORK SERVICE account (Windows 2003). This is a low privilege account, and does not have the right to access the hard drive. In order to allow the service to write to the hard drive, the web process account needs to be allowed write permission to a folder exclusively. We all know about this security problem, so I won't go into details about it.
Now, we will be testing all possible things that we normally do from a Windows Service:
- Write to a file
- Database operations
- Web Service calls
- MSMQ operations
- Email send
Let's write some test code for this inside the
DoWork method:private void DoWork()
{
Debug.WriteLine("Begin DoWork...");
Debug.WriteLine("Running as: " +
WindowsIdentity.GetCurrent().Name );
DoSomeFileWritingStuff();
DoSomeDatabaseOperation();
DoSomeWebserviceCall();
DoSomeMSMQStuff();
DoSomeEmailSendStuff();
Debug.WriteLine("End DoWork...");
}
Testing file write
Let's test if we can really write to a file. Create a folder named “temp” in your C drive, and if the drive is an NTFS partition, allow the ASPNET/NETWORK SERVICE account to write to that folder.
private void DoSomeFileWritingStuff()
{
    Debug.WriteLine("Writing to file...");

    try
    {
       using( StreamWriter writer =
        new StreamWriter(@"c:\temp\Cachecallback.txt", true) )
       {
        writer.WriteLine("Cache Callback: {0}", DateTime.Now);
        writer.Close();
       }
    }
    catch( Exception x )
    {
       Debug.WriteLine( x );
    }

    Debug.WriteLine("File write successful");
}
Open the log file, and you should see entries like:
Cache Callback: 10/17/2005 2:50:00 PM
Cache Callback: 10/17/2005 2:52:00 PM
Cache Callback: 10/17/2005 2:54:00 PM
Cache Callback: 10/17/2005 2:56:00 PM
Cache Callback: 10/17/2005 2:58:00 PM
Cache Callback: 10/17/2005 3:00:00 PM
Testing database connectivity
Run the following script in your “tempdb” database inside SQL Server 2000:
IF EXISTS (SELECT * FROM dbo.sysobjects WHERE id =
    object_id(N'[dbo].[ASPNETServiceLog]') AND
    OBJECTPROPERTY(id, N'IsUserTable') = 1)
DROP TABLE [dbo].[ASPNETServiceLog]
GO

CREATE TABLE [dbo].[ASPNETServiceLog] (
    [Mesage] [varchar] (1000)
    COLLATE SQL_Latin1_General_CP1_CI_AS NOT NULL ,
    [DateTime] [datetime] NOT NULL
) ON [PRIMARY]
GO
This will create a table named ASPNETServiceLog for you. Remember, as it is created in tempdb, this table will disappear when SQL Server restarts.
Next, make the ASPNET/NETWORK SERVICE account a member of db_datawriter of the tempdb database. Alternatively, you can define a more specific permission and allow only writing to the table.
Now write the test function:
private void DoSomeDatabaseOperation()
{
    Debug.WriteLine("Connecting to database...");

    using( SqlConnection con = new SqlConnection("Data Source" +
           "=(local);Initial Catalog=tempdb;Integrated Security=SSPI;") )
    {
        con.Open();

        using( SqlCommand cmd = new SqlCommand( "INSERT" +
               " INTO ASPNETServiceLog VALUES" +
               " (@Message, @DateTime)", con ) )
        {
            cmd.Parameters.Add("@Message", SqlDbType.VarChar, 1024).Value =
                               "Hi I'm the ASP NET Service";
            cmd.Parameters.Add("@DateTime", SqlDbType.DateTime).Value =
                               DateTime.Now;

            cmd.ExecuteNonQuery();
        }

        con.Close();
    }

    Debug.WriteLine("Database connection successful");
}
This will create entries in the log table, which you can check later on to ensure if there was any delay between the service execution. You should be getting one row per two minutes.
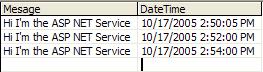
Figure 1: ASP NET Service Log Table Data
Testing email delivery
The most common requirement for running a Windows Service is to send periodical email alerts, notifications, status reports, etc., via mail. So, it's important that we test if email works from such a service:
private void DoSomeEmailSendStuff()
{
    try
    {
       MailMessage msg = new MailMessage();
       msg.From = "abc@cde.fgh";
       msg.To = "ijk@lmn.opq";
       msg.Subject = "Reminder: " + DateTime.Now.ToString();
       msg.Body = "This is a server generated message";

       SmtpMail.Send( msg );
    }
    catch( Exception x )
    {
       Debug.WriteLine( x );
    }
}
Please replace From and To recipient addresses with some meaningful address, and you should be getting email alerts every two minutes.
Testing MSMQ
Let's write a small function to test whether we can access MSMQ from ASP.NET properly:
private void DoSomeMSMQStuff()
{
    using( MessageQueue queue = new MessageQueue(MSMQ_NAME) )
    {
        queue.Send(DateTime.Now);
        queue.Close();
    }
}
Alternatively, you can call the
Receive method of the queue to get pending messages in the queue that needs to be processed.
One issue that you should remember here is, do not subscribe to the
Receive event of the queue. As the thread can die anytime and the Web Server can be restarted anytime, a continuous blocked Receive will not work properly. Besides, if you call the BeginReceive method and block code execution until a message arrives, the service gets stuck and other codes will not run. So, in this case, you will have to call the Receive method to fetch the pending messages.Extending the system
The ASP.NET Service can be extended in many ways to allow pluggable jobs. You can introduce Job queuing from web pages which this service will execute periodically. For example, you can queue jobs in a cache item and the services pick up the job and executes it. This way, you can simulate a nice job processing system inside your ASP.NET project. Previously, this was only possible with a Windows Service, but now you can do it with ASP.NET also.
Let's make a simple
Job class which contains information about a job to execute.public class Job
{
public string Title;
public DateTime ExecutionTime;
public Job( string title, DateTime executionTime )
{
this.Title = title;
this.ExecutionTime = executionTime;
}
public void Execute()
{
Debug.WriteLine("Executing job at: " + DateTime.Now );
Debug.WriteLine(this.Title);
Debug.WriteLine(this.ExecutionTime);
}
}
From a simple ASPX page, we will queue a job to a static
ArrayList called _JobQueue declared in Global.asax:Job newJob = new Job( "A job queued at: " + DateTime.Now,
DateTime.Now.AddMinutes(4) );
lock( Global._JobQueue )
{
Global._JobQueue.Add( newJob );
}
So, the job gets queued to be executed after 4 minutes. The service code runs every two minutes and checks the job queue if there's anything that is overdue and needs to be executed. If there's any job waiting, it is removed from the queue and executed. The service code now has an additional method called
ExecuteQueuedJobs. This function does the scheduled job execution:private void ExecuteQueuedJobs()
{
ArrayList jobs = new ArrayList();
// Collect which jobs are overdue
foreach( Job job in _JobQueue )
{
if( job.ExecutionTime <= DateTime.Now )
jobs.Add( job );
}
// Execute the jobs that are overdue
foreach( Job job in jobs )
{
lock( _JobQueue )
{
_JobQueue.Remove( job );
}
job.Execute();
}
}
Don't forget to lock the static job collection because ASP.NET is multithreaded, and pages being executed on different threads have a high possibility for trying to write on the job queue at the same time.
Who can benefit from this
ASP.NET developers who host their website on shared hosting environments which do not offer a Windows Service feature can benefit from this code. Also for those who do not have their own dedicated server to install Windows Services.
How to run the sample project
The sample project is a very simple website with a dummy page. All the code is inside Global.asax. You need to modify the connection string, MSMQ name, and the folder path according to your settings.
Here's how to setup the code:
- Extract the zip in a folder.
- Create a virtual directory named "TestCacheTimeout" and map to the extracted folder.
- Load the project file and run.
- Create an MSMQ Queue called "ASPNETService".
- Run the SQL to create the log table in tempdb, as explained earlier.
- Create a temp folder in C: drive and add the ASPNET/NETWORK SERVICE account with Write permission.
- Fix all the constants available in Global.asax.
If you want to add the code in your own project, do the following:
- Copy the Global.asax code to yours.
- Create a dummy page which queues the cache item. The dummy page needs no code.
- Modify the constants available in the Global.asax at the beginning.


