среда, 22 января 2014 г.

AWS Memory Monitoring Script for Windows Server Error: "Please Install .NET sdk for this script to work."

The location of the SDK has changed
Change the following line:
$SDKLibraryLocation = dir C:\Windows\Assembly -Recurse -Filter "AWSSDK.dll"
to:
$SDKLibraryLocation = dir "C:\Program Files (x86)\AWS Tools\PowerShell\AWSPowerShell" -Recurse -Filter "AWSSDK.dll"

среда, 8 января 2014 г.

How to determine Read/Write intensive table from DMV/DMF statistics

This is a follow-up question on Stack Overflow question
The goal is the same as the previous question
The goal here is to find out appropriate fill factor for indexes
According to Mitch Wheat's answer, he suggested that
... ordinary tables use the default 90% fill factor, high insert tables somewhere between 70 - 85% (depending on row size). Read only tables can utilise a fill factor of 100%
Even after finding out index statistics, I am having trouble making sense of the result. 
How do you determine whether a table is a high
  • insert
  • read
  • insert/read table?
Do you have to take all stats like leaf_insert_countleaf_delete_count,user_seek/scan/lookup_count etc into account?
or Would I need to look at only few domains?
I would love to see what other ways there are to determine how to determine fill factor for a particular index.
Query used to get index stats,
select  db_name(US.database_id)
 , object_name(US.object_id)
 , I.name as IndexName
 , OS.leaf_allocation_count
 , OS.nonleaf_allocation_count
 , OS.leaf_page_merge_count
 , OS.leaf_insert_count
 , OS.leaf_delete_count
 , OS.leaf_update_count
 , *
from sys.dm_db_index_usage_stats US
 join sys.indexes I 
  on I.object_id = US.object_id 
  and I.index_id = US.index_id
 join sys.dm_db_index_operational_stats(db_id(), null, null, null) OS
  on OS.object_id = I.object_id and OS.index_id = I.Index_id
where I.type <> 0  -- not heap
 and object_name(US.object_id) not like 'sys%'
order by OS.leaf_allocation_count desc, 
  OS.nonleaf_allocation_count desc, 
  OS.leaf_page_merge_count desc,
  US.User_updates desc, 
  US.User_Seeks desc, 
  US.User_Scans desc, 
  US.User_Lookups desc
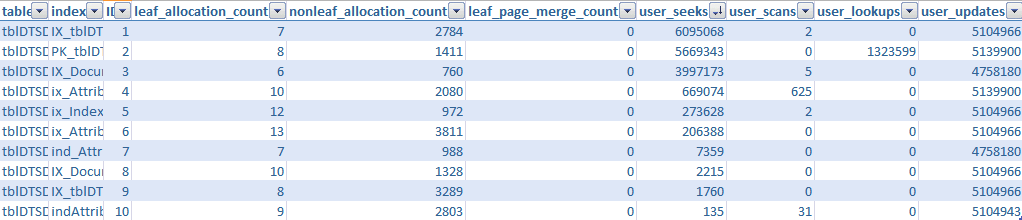
And sample result.
alt text

пятница, 3 января 2014 г.

Visual Studio : Build Solution, Rebuild Solution and Clean Solution

I always thought of what is the difference in Build, Rebuild and Clean Solution and which one is appropriate to use at which time?

So I tried to find the reason and here is my findings.

Clean solution

will remove the build intermediate files from the previous build. If there are any other files in the build target directories like bin and obj they may not be removed, but actual build artifacts will be removed. 

Build solution

will build assemblies, if there is no change in assembly after previous build then it would not build the assembly. So it use partially-built wherever changes occurred after previous build.


Rebuild solution

will clean and then build the solution from scratch, regardless of changes has been occurred or not.


Here comes another question, rebuild will clean and then build the solution, so Is it equivalent to Clean Solution and then Build the solution?


Actually No!!! they are not equal. 

The difference is in the sequence projects get clean and build. Let say we have two projects in a solution. Clean and then build will perform clean to both projects and then build will occur individually while on rebuild project A will get and clean and then build after that project B will be clean and then build and so on.


If you have any comments please do post.

Renaming Project Solution and Items

Today I need to rename one of my Project Solution.It is actually complex to do correctly because the project name is used in several places.

Here are steps you need to follow to rename a solution:

Step 1:

In Solution Explorer, right-click the project, select Rename, and enter a new name.

Step 2:

In Solution Explorer, right-click the project and select Properties. On the Application tab, change the"Assembly name" and "Default namespace".

Step 3:

In the main cs file (or any other code files), rename the namespace declaration to use the new name. For this right-click the namespace and select Refactor > Rename enter a new name. For example:

1namespace WindowsFormsApplication1


Step 4:

Change the AssemblyTitle and AssemblyProduct in Properties/AssemblyInfo.cs.

1[assembly: AssemblyTitle("New Name Here")]
2[assembly: AssemblyDescription("")]
3[assembly: AssemblyConfiguration("")]
4[assembly: AssemblyCompany("")]
5[assembly: AssemblyProduct("New Name Here")]
6[assembly: AssemblyCopyright("Copyright ©  2013")]
7[assembly: AssemblyTrademark("")]
8[assembly: AssemblyCulture("")]

Step 5:

Delete bin and obj directories physically.

Step 6:

Rename the project physical folder directory.

Step 7:

Open the SLN file(within notepad or any editor) and change the path to the project.

Step 8:

Cleans and Rebuild the project

Here it is now your project is completely renamed.
If you found any other place which I missed do comment here.