вторник, 15 декабря 2009 г.

Как получать и передавать значения из одной формы в другую Windows Forms C# .Net

Вопрос этот много раз уже здесь обсуждался, надо было бы немного поиском тебе поработать. Ну да ладно, меня не обламывает. Есть два решения:
1) Выставить у контрола главной формы модификатор internal, тогда он будет доступен по имени. Но это не совсем правильный подход с точки зрения проектирования UI.
2) Доступ к экземпляру формы по имени, к его контролам - по коллекции. Например, получить кнопку главной формы из любой другой формы можно так:
Код:
Form frmMain = Application.OpenForms["frmMain"]; 
Button
btn1 = (Button)frmMain.Controls["button1"];
Где frmMain - имя формы (т.е. Name, а не Text!!)

понедельник, 14 декабря 2009 г.

Using System.DirectoryServices.AccountManagement


Introduction

In this article, we will be focusing on creating, editing, and deleting both user accounts or groups on Active Directory or Machine SAM by using theSystem.DirectoryServices.AccountManagement namespace that .NET Framework 3.5 includes. We were able to develop these functionalities by using the Invoke method of the DirectoryEntry object which is returned by the DirectorySearcher component in .NET Framework 2.0, but this new namespace works faster and is easy to develop. It also is in a more object oriented structure.
Before starting, let's just have a sneak peek at the objects we will be using during this article.
PrincipalContextPrincipalContext is the object that provides directory services such as AD or Machine SAM. In other words, it holds the connection to a directory.
PrincipalPrincipal is the base class of principal objects that we will be describing below. It includes common methods such as Save, Delete.
GroupPrincipalAs can be understood from the name, the GroupPrincipal object provides functionality for Group objects at directory level and is derived from thePrincipal object.
AuthenticablePricipalThis class is also derived from the Principal class, and besides that, it includes methods for authentication mechanisms.
UserPricipalUserPrincipal is the object that represents users on both the Active Directory or the Local SAM, it provides functionality for user items.

Using the code

I believe that the best learning method in programming is writing code. So, let's start writing our code. Instead of pasting all the code here, I will give some examples of critical points, and try to explain the idea of working with these classes.
For further information, you can download the source from the link above. Here are some functionalities this program includes.
  • Groups: Listing, Filtering, Creating, Editing, Deleting, Viewing users of a group.
  • Users: Listing, Filtering, Creating, Editing, Deleting, Changing password, Viewing user groups, Adding user to a group, Removing user from a group.
Let's start with creating an instance of a PrincipalContext object.
Collapse
PrincipalContext insPrincipalContext =    new PrincipalContext(ContextType.Machine);//Connecting to local computer. PrincipalContext insPrincipalContext = new PrincipalContext(ContextType.Domain, "MyDomain",                                         "DC=MyDomain,DC=com");                                        //Connecting to Active Directory PrincipalContext insPrincipalContext = new PrincipalContext(ContextType.Machine,"TAMERO",                                         "administrator","password");                                        //Connecting to local computer                                         //with credentials of an user
As you see, there is no difference between connecting to a Machine SAM and Active Directory. I will continue with my article giving examples from Machine SAM, but as I said, there is no difference. Also, with this object, you can validate a user's credentials. I will provide an example of using this method at the end of the article.
Now, let's look at how to list or filter users or groups.
Collapse
private void SearchGroups(GroupPrincipal parGroupPrincipal) {     lbGroups.Items.Clear();     PrincipalSearcher insPrincipalSearcher = new PrincipalSearcher();     insPrincipalSearcher.QueryFilter = parGroupPrincipal;     PrincipalSearchResult results = insPrincipalSearcher.FindAll();     foreach (Principal p in results)     {         lbGroups.Items.Add(p);     } } private void SearchUsers(UserPrincipal parUserPrincipal) {     lbUsers.Items.Clear();     PrincipalSearcher insPrincipalSearcher = new PrincipalSearcher();     insPrincipalSearcher.QueryFilter = parUserPrincipal;     PrincipalSearchResult results = insPrincipalSearcher.FindAll();     foreach (Principal p in results)     {         lbUsers.Items.Add(p);     } } private void ListGroups() {     GroupPrincipal insGroupPrincipal = new GroupPrincipal(insPrincipalContext);     insGroupPrincipal.Name = "*";     SearchGroups(insGroupPrincipal); } private void ListUsers() {     UserPrincipal insUserPrincipal = new UserPrincipal(insPrincipalContext);     insUserPrincipal.Name = "*";     SearchUsers(insUserPrincipal); }
Now, let's look at the logic behind listing and filtering users or groups. You can easily see that both the SearchGroups and SearchUsers methods are similar. The most important point is using GroupPrincipal for Group, and UserPrincipal for User functions. And, principal searcher is the common class that provides the search functionality. After assigning an object (GroupPrincipal or UserPrincipal) that contains filters to the QueryFilter property of this object, the FindAll method returns all the records, and the FindOnemethod returns the first record. And, another point is how to set search criteria, for example, for a property that contains a "b" character, you can assign "*b*" to that property, or for a property that starts with a "b" character, you can assign "b*" to that property. I will also tell how to set filters that depend on comparison (e.g., PasswordExpirationDate is in the next 5 days) at the end of this article.
Now, let's look at the code that creates a new user:
Collapse
UserPrincipal insUserPrincipal = new UserPrincipal(insPrincipalContext);  //method that assign properties to insUserPrincipal object insUserPrincipal.Save(); insUserPrincipal.Dispose(); MessageBox.Show("User created."); GroupPrincipal insGroupPrincipal = new GroupPrincipal(insPrincipalContext);  //method that assign properties to insGroupPrincipal object insGroupPrincipal.Save(); insGroupPrincipal.Dispose(); MessageBox.Show("Group created.");
It is very easy to create an entry. As you can see, after creating a principal object (User or Group), invoking its Save method saves the record. Editing and deleting works the same. Instead of creating a Principal object, if you get a Principal object reference, then change the properties and invoke the Save method, and your object is updated. For deleting an entry, the only thing you should do is call the Delete method of the Principal object that references to the entry.
And now, let's talk about changing the password of a user:
Collapse
UserPrincipal insUserPrincipal = (UserPrincipal)lbUsers.SelectedItem; insUserPrincipal.SetPassword("12345678"); MessageBox.Show("Password changed.");
You can get the members of a group from the Members property of the GroupPrincipal object. You can use this property as an enumeration. To add a user to a group, you should add the UserPrincipal object that holds the reference of a user to this enumeration. And the same logic for removing a user from a group: you must remove that user from the enumeration. But, do not forget to execute the Save method of GroupPrincipal after making changes. You can list the user groups by executing the method GetGroups() of theUserPrincipal object. Here are some examples:
Collapse
//Listing groups members GroupPrincipal insGroupPrincipal = (GroupPrincipal)lbGroups.SelectedItem; List insListPrincipal = new List(); foreach (Principal p in insGroupPrincipal.Members) {     insListPrincipal.Add(p); }  //Listing users groups UserPrincipal insUserPrincipal = (UserPrincipal)lbUsers.SelectedItem; List insListPrincipal = new List(); foreach (Principal p in insUserPrincipal.GetGroups()) {     insListPrincipal.Add(p); }  //Adding user to a group UserPrincipal insUserPrincipal = (UserPrincipal)lbUsers.SelectedItem; GroupPrincipal groupPrincipal =    GroupPrincipal.FindByIdentity(insPrincipalContext, group.GroupName); if (groupPrincipal.Members.Contains(insPrincipalContext,      IdentityType.SamAccountName, insUserPrincipal.SamAccountName)) {     MessageBox.Show(insUserPrincipal.Name +        " is already a member of group " + group.GroupName);     return; } groupPrincipal.Members.Add(insUserPrincipal); groupPrincipal.Save();  //Removing user from a group UserPrincipal insUserPrincipal = (UserPrincipal)lbUsers.SelectedItem; GroupPrincipal groupPrincipal =    GroupPrincipal.FindByIdentity(insPrincipalContext, group.GroupName); groupPrincipal.Members.Remove(insUserPrincipal); groupPrincipal.Save();
And, here is the code for validating user credentials and filtering comparison values:
Collapse
insPrincipalContext.ValidateCredentials("Tamer", "12345678"); parUserPrincipal.AdvancedSearchFilter.AccountExpirationDate(                  DateTime.Now.Date.AddDays(10), MatchType.Equals); parUserPrincipal.AdvancedSearchFilter.BadLogonCount(5, MatchType/span>.GreaterThanOrEquals);
четверг, 10 декабря 2009 г.

How Do I Add an Additional Item To a Databound DropDownList Control in ASP.NET?

It's a common practice to bind some data to a DropDownList or ListBox control. The data for these controls can come from a wide variety of DataSources including Arrays, ArrayLists, HashTables and DataSets. Quite often, though, you'll have the need to add an additional item to the beginning of the list.

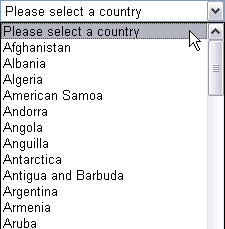
This item often instructs your user to select an item from the list, as you can see in the following screenshot:

A drop-down list with the first item instructing the user to select an item

The list with countries is preceded by an item with the text Please select a country. Since this item is usually not present in the datasource, you'll have to add it either manually programmatically through some code.

ASP.NET 2.0 and Later

In ASP.NET 2.0 and onwards things are much easier. The DropDownList control and other list controls now have a AppendDataBoundItems property. With this property set to true, a call to DataBind leaves all existing items in the list. That allows you to add the extra items declaratively in the markup:

<asp:dropdownlist id="DropDownList1" runat="server" AppendDataBoundItems="true">
<asp:listitem value="">Please select a country</asp:ListItem>
</asp:DropDownList>

That's it. No more messing around with code in the code behind to add the item. Just setAppendDataBoundItems to true and the manually added item stays where it was.

воскресенье, 29 ноября 2009 г.

Many to many relationships in the entity data model

This tutorial will explain how many-to-many relationships appear in the Entity Data Model.

What is a Many-to-Many relationship?

A many-to-many relationship is one where two data tables or entities have multiple rows that are connected to one or more rows in the other table.

A typical example is the EmployeeAddress join table in the AdventureWorks sample database. One employee could have multiple addresses (home, vacation, etc.) and it's possible for one address to apply to multiple employees. In databases, a join table is generally used to create the relationships.

Note that there are additional properties in the join table to track the address type (a customization of the original table), when the joins were created/modified and a unique identifier for each row.

mtom1

Another example of this is Students and Classes in a database for managing a school. One student can be in many classes and one class can have many students. m2m2

Many to Many Relationships in the Entity Data Model

The Entity Data Model Wizard handles these two sets of tables very differently when they are imported into an EDM.

The Employee/Addresses entities mirror the tables -- two entities with a join entity in between. There are navigation properties to traverse between the three entities, Employee.EmployeeAddresses gets you from the Employee to the join entity and from there you can use EmployeesAddresses.Addresses to get the addresses for the Employee you began with.

m2m3

Using this data in code requires building join queries or queries that drill through multiple navigation properties (eg Employee.EmployeeAddress.Addresses), for example:

Private Sub employeeaddress()    Dim aw As New AdventureWorksTModel.AdventureWorksTEntities    Dim empaddQuery = From e In aw.Employees, ea In e.EmployeeAddresses _          Select e.EmployeeID, e.HireDate, ea.AddressType, ea.Addresses.City    For Each emp In empaddQuery.OrderBy(Function(e) e.EmployeeID)       Console.WriteLine(String.Format("ID {0}:: Hire Date: {1:d}, Address Type: {2}, City {3}", _       emp.EmployeeID, emp.HireDate, emp.AddressType, emp.City))    Next End Sub 

Which results with:

ID 1:: Hire Date: 7/31/1996, Address Type: Home , City Monroe
ID 1:: Hire Date: 7/31/1996, Address Type: Vacation , City Seattle
ID 2:: Hire Date: 2/26/1997, Address Type: Home , City Bellevue
ID 2:: Hire Date: 2/26/1997, Address Type: Weekend , City Everett
etc...

The student/class entities however, have no join table. Instead they have navigation properties to get to their related data. You can query class.students and you can query for student.classes.
m2m4

This is a special benefit that the Entity Framework provides when join tables contain only the keys and no additional columns.

Because of this it is possible to traverse directly into the related data without the use of a join entity. Here's an example that uses a nested from clause to create an anoymous type based on the related data.

Private Sub studentclasses()   Dim school As New SchoolSampleModel.SchoolSampleEntities   Dim studclassQuery = From student In school.students From c In student.classes _                        Select student.firstname, student.lastname, c.classname     For Each student In studclassQuery.OrderBy(Function(s) s.lastname & s.firstname)       Console.WriteLine(String.Format("Student {0},{1}: {2}", _                                       student.lastname.TrimEnd, student.firstname.Trim, student.classname))     Next End Sub 

Which results with:

Student Doe,John: European History
Student Doe,John: Art History
Student Robin,Stacey: American History
Student Smith,Jane: American History
Student Smith,Jane: French
Student Williams,Bill: European History
Student Williams,Bill: French
Student Williams,Bill: Computers 101

среда, 25 ноября 2009 г.

Modal Popup Extender and show/hide

<cc1:modalpopupextender id="ModalPopupExtender1" runat="server" BehaviorID="MsgPopup" targetcontrolid="LinkButton1" BackgroundCssClass="modalBackground" PopupControlID="Panel2"></cc1:modalpopupextender>

instead id, use BehaviorId

$find('MsgPopup').show() // to show the ModalPopupExtender.

$find('MsgPopup').hide() // to hide the ModalPopupExtender.

понедельник, 23 ноября 2009 г.

Configuring IIS for Silverlight Applications

Introduction

Microsoft® SilverlightTM is a cross-browser, cross-platform plug-in for delivering the next generation of .NET based media experiences and rich interactive applications for the Web. Silverlight offers a flexible programming model that supports AJAX, VB, C#, Python, and Ruby, and integrates with existing Web applications. Silverlight supports fast, cost-effective delivery of high-quality video to all major browsers running on the Mac OS or Windows.

In most cases, hosters do not need to perform particular deployments to support Silverlight. However, check for the following basic items that could prevent Silverlight from functioning correctly.

MIME Types

In Windows Server 2008 IIS 7.0

All MIME types needed to support Silverlight are implemented by default in Windows Server 2008 IIS 7.0 and Windows Vista SP1. Windows Vista RTM customers can add mime types by running "IIS Manager", clicking on "Mime Types", then clicking "add" and adding the following mime types:

  • .xap application/x-silverlight-app
  • .xaml application/xaml+xml
  • .xbap application/x-ms-xbap

Alternatively, you can add the following mime types to your %windir%\system32\inetsrv\config\applicationHost.config file in the section.


In Windows Server 2003 IIS 6.0

To enable IIS 6.0 in Windows Server 2003 or IIS7 in Windows Vista RTM with the appropriate MIME Types, add:

  • .xap application/x-silverlight-app
  • .xaml application/xaml+xml
  • .xbap application/x-ms-xbap

Here is a VBS script you could run to enable each of these types:

Const ADS_PROPERTY_UPDATE = 2
'
if WScript.Arguments.Count < 2 then
WScript.Echo "Usage: " + WScript.ScriptName + " extension mimetype"
WScript.Quit
end if
'
'Get the mimemap object.
Set MimeMapObj = GetObject("IIS://LocalHost/MimeMap")
'
'Get the mappings from the MimeMap property.
aMimeMap = MimeMapObj.GetEx("MimeMap")
'
' Add a new mapping.
i = UBound(aMimeMap) + 1
Redim Preserve aMimeMap(i)
Set aMimeMap(i) = CreateObject("MimeMap")
aMimeMap(i).Extension = WScript.Arguments(0)
aMimeMap(i).MimeType = WScript.Arguments(1)
MimeMapObj.PutEx ADS_PROPERTY_UPDATE, "MimeMap", aMimeMap
MimeMapObj.SetInfo
'
WScript.Echo "MimeMap successfully added: "
WScript.Echo " Extension: " + WScript.Arguments(0)
WScript.Echo " Type: " + WScript.Arguments(1)

If you copy and paste the code above into a VBS file and save it as ADDMIMETYPE.VBS the syntax to add each type would be:

ADDMIMETYPE.VBS .xap application/x-silverlight-app ADDMIMETYPE.VBS .xaml application/xaml+xmlADDMIMETYPE.VBS .xbap application/x-ms-xbap

Using the IIS Manager User Interface in Windows Server 2003 IIS 6.0

1. Go to Start\Administrative Tools and run IIS Manager, see figure below:

2. Right click on the server name and select "Properties", see figure below:

3. In the Properties Dialog, click on the "MIME Types" button, see figure below:

4. In the "MIME Types" Dialog, click the "New" button, see figure below:

5. In the "MIME Type" Dialog enter one MIME Type at the time:

  • .xap application/x-silverlight-app
  • .xaml application/xaml+xml
  • .xbap application/x-ms-xbap
  • see figure below:

    For detailed information on Silverlight, visit http://silverlight.net/.

    пятница, 20 ноября 2009 г.

    Semi transparent Silverlight on top of HTML

    My last post was about laying Silverlight on top of HTML, using CSS for positioning and ordering of the layers.

    However one thing that had me stumped for a bit was how to set the transparency on the Silverlight area. Surely it can't be that hard!?

    Lessons learned

    In my previous post I mentioned, possibly using the CSS opacity setting on the tag to achieve the goal. Having had a play around, I found that, yes you can do it that way, and it seems to work fine (keep in mind different browsers support it somewhat differently). However there is a much simpler and neater way of doing it.

    In the default test page that gets created the tag takes a parameter named background , this gave me the first clue.

    SilverlightControlHost

    Next I saw Michael Kordahi's example of overlaying SL on top of HTML and got some ideas from how he was doing things, the problem was that he was using the SL 1.0 way of calling up the silverlight using the createSilverlight() in a silverlight.js file etc. So I had to figure out how to translate that into what I was doing, it would seem pretty basic. Michael was passing in the following as part of his javascript call to create the Silverlight object. background:'transparent', isWindowless: 'true'. However passing in those as parameters to my HTML objet tag didn't work.

    To make what was a pretty long story short( the long version including me stumbling around trying to figure things out) , here is what I learned.

    A. There seems to be some issues with passing in parameters to HTML , I got caught out a few times making changes then refreshing the page and nothing happening (making me think I was doing it wrong), this went on until I found some resources confirming that I was in fact doing it the right way. Once I started closing and restarting the browser between changes, things worked a lot better.

    B. The background and windowless attributes seem to be SL2 specific ones. Looking at various resources (including both W3C and Microsoft) covering the HTML tag gave me no information, however eventually I came upon this blog post by Alex Golesh, that briefly talks about the difference in between SL2 and CreateSilverlight(), this post in itself didn't really tell me what I wanted to know but it pointed me onwards and evetually I found my way to the Microsoft SL2 documentation about Instantiating a Silverlight Plug-In. You can tell it's beta documentation but at least it's got some info, I guess this was a lesson learnt, start by looking at the MS documentation, then hit the web.

    So, on to the actual solution!

    As I said it seems like it should be pretty simple, and guess what, it is! There's two steps, first edit the hosting page, then make the necessary modifications to the XAML.

    Step 1

    If you're hosting your SL in a HTML page, set the background parameter to transparent and the windowless parameter to true. Also keep in mind the size, building a full SL app this is usually set to 100% width and height, however if we want to use it together with the HTML, we want to change it to match the actual size of your XAML/Silverlight element.

    SL-HTML
    If you're hosting it in a aspx page using the SL2 Silverlight control, you want to do the same adjustments as above, adjust the size, then add the parameters PluginBackground and Windowless.

    SL-ASPX

    As per usual when working with server controls you can either change things in code as per above or use the properties window as below.
    SL-Properties

    Step 2

    Adjust the opacity/transparency of the XAML, this can be done in a few different ways and they have slightly different outcomes.

    Option 1

    Setting the opacity of the user control
    image
    Or on the LayoutRoot element
    image
    Gives the following result
    image
    The thing to notice here is that the opacity setting is inherited by the children of the control it's set on.
    Hence both the canvas and the button are effected in both cases.

    Option 2

    A slightly different and most of the time a probably, a more appropriate way of setting the transparency/opacity, is to set the background of the LayoutRoot, to the hexadecimal representation of a colour and include the alpha transparency.
    image
    Which gives us the following result, where the background is semi transparent but the button is not affected.
    image

    Hope you find this useful, I've definitely found that resources in regards to this seems a bit sparse at the moment. And the ones that are out there can be a bit tricky to find.

    Links

    Blog post by Malky Wullur on overlaying Silverligth on top of Virtual Earth, very cool.
    http://geeks.netindonesia.net/blogs/malky/archive/2008/04/16/route-animation-silverlight-with-virtual-earth.aspx

    Post by Alex Golesh on Instantiating a Silverlight Plug-In
    http://blogs.microsoft.co.il/blogs/alex_golesh/archive/2008/03/16/silverlight-2-amp-createsilverlight.aspx

    Using Silverlight.js
    http://msdn2.microsoft.com/en-us/library/cc265155(VS.95).aspx

    Instantiating a Silverlight Plug-In (Silverlight 2)
    http://msdn2.microsoft.com/en-us/library/cc189089(VS.95).aspx#

    HTML Objects
    http://msdn2.microsoft.com/en-us/library/ms535859(VS.85).aspx#

    среда, 18 ноября 2009 г.

    Automatic Generation of Stored Procedure Return Types

    new feature of the Entity Framework in .NET 4.0 is the ability to return collections of complex type instances from stored procedures. In the next public release of the designer, we have enriched this functionality by adding the ability to automatically create these complex types by querying stored procedure metadata from the database server. To demonstrate this feature, we will use the Northwind database, and we will focus on a stored procedure called “CustOrdersDetail”. Looking at the designer’s model browser window after we reverse engineer Northwind, we see:

    Untitled

    Double-clicking “CustOrdersDetail” brings up the “Add Function Import” dialog:

    Untitled

    We click “Get Column Information” in order to see the metadata returned by the server about this stored procedure’s return columns. Then, we click on the “Create New Complex Type” button, and the designer automatically creates a new complex type that matches the shape of the data returned from the stored procedure:

    Untitled

    To make life more interesting (and realistic,) let’s rename some of the properties in the generated complex type: ProductName to Name, and UnitPrice to Price. To keep things running, we then need to fix the function import’s mappings to look like this:

    Untitled

    Finally, to simulate some real-world churn, we change the stored procedure’s return shape: We’ll rename “UnitPrice” to “UnitPricing”, add a new column called “Foo”, and delete “Quantity”:

    ALTER PROCEDURE CustOrdersDetail @OrderID int
    AS
    SELECT ProductName,
    UnitPricing=ROUND(Od.UnitPrice, 2),
    Discount=CONVERT(int, Discount * 100),
    Foo = '!',
    ExtendedPrice=ROUND(CONVERT(money, Quantity * (1 - Discount) * Od.UnitPrice), 2)
    FROM Products P, [Order Details] Od
    WHERE Od.ProductID = P.ProductID and Od.OrderID = @OrderID

    That done, we double click on the function import again, get column information, and this time, click on the “Update” button. The designer will now inspect the mappings, the existing complex type, and the new return shape, and produce these proposed changes to the complex type:

    Untitled

    As you can see, “Foo” will be added, and “Quantity” will be deleted. In addition, the mappings are used to map “Name” to “ProductName” meaning no action will be taken for it. Finally, since “UnitPricing” is seen as new, “Price” will be deleted and “UnitPricing” will be put in its stead. Since we do not want this, we will rename the column in the function import’s mapping to “UnitPricing” and rerun the above process. This time we get:

    Untitled

    Which is what we would want.

    In conclusion, the designer now exposes the Entity Framework’s new ability to return complex type instances from stored procedure. On top of this, it adds some features to make this capability easier to use and to iterate over. In future releases of Visual Studio, we will improve the iterative features and look into supporting batch imports of stored procedures, so that you will not need to import them one by one. We look forward to your feedback.

    Noam Ben-Ami
    Program Manager, Entity Designer