четверг, 28 февраля 2013 г.

Microsoft.WebApplication.targets was not found


Based on the post here http://lucbei.wordpress.com/2011/12/04/new-build-server-microsoft-webapplication-targets-was-not-found/ you can simply download the "Microsoft Visual Studio 2010 Shell (Integrated) Redistributable Package" from http://www.microsoft.com/download/en/confirmation.aspx?id=115 and the targets are installed.
This avoids the need to install Visual Studio on the build server.
I have just tried this out now, and can verify that it works:
Before:
error MSB4019: The imported project "C:\Program Files (x86)\MSBuild\Microsoft\VisualStudio\v10.0\WebApplications\Microsoft.WebApplication.targets" was not found. Confirm that the path in the declaration is correct, and that the file exists on disk.
After the install:
[Builds correctly]
This is a far better solution than installing Visual Studio on a build server, obviously.

вторник, 26 февраля 2013 г.

How To Run MongoDB As Windows Service


1. mongod –help

Get to know all the Windows service related commands by typing “mongod --help“.
C:\MongoDB\bin>mongod --help
 
Windows Service Control Manager options:
  --install                install mongodb service
  --remove              remove mongodb service
  --reinstall             reinstall mongodb service (equivilant of mongod
                             --remove followed by mongod --install)
  --serviceName arg           windows service name
  --serviceDisplayName arg windows service display name
  --serviceDescription arg    windows service description
  --serviceUser arg              user name service executes as
  --servicePassword arg       password used to authenticate serviceUser
Two “--install” and “--remove” arguments are what you need.

2. Install as Windows Service

To install as Windows service, issue “mongod --install“, for example :
#> mongod --dbpath "c:\mymongodb" --logpath "c:\mymongodb\logs.txt" --install --serviceName "MongoDB"
all output going to: c:\mymongodb\logs.txt
Creating service MongoDB.
Service creation successful.
Service can be started from the command line via 'net start "MongoDB"'.
It means, install a MongoDB, which point to “c:\mymongodb” data directory, log outputs to “c:\mymongodb\logs.txt“, and a Windows service named “MongoDB“.
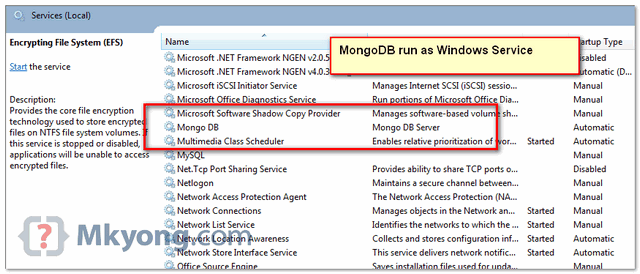
Figure : MongoDB is installed as Windows Service
mongodb as windows service

3. Uninstall It

To uninstall above installed MongoDB service, issue “mongod --remove“, along with the installed service name.
#> mongod --remove --serviceName "MongoDB"
Deleting service MongoDB.
Service deleted successfully.
Fri Apr 29 18:39:06 dbexit:
Fri Apr 29 18:39:06 shutdown: going to close listening sockets...
Fri Apr 29 18:39:06 shutdown: going to flush diaglog...
Fri Apr 29 18:39:06 shutdown: going to close sockets...
Fri Apr 29 18:39:06 shutdown: waiting for fs preallocator...
Fri Apr 29 18:39:06 shutdown: closing all files...
Fri Apr 29 18:39:06 closeAllFiles() finished
Fri Apr 29 18:39:06 dbexit: really exiting now
Done.

суббота, 9 февраля 2013 г.

Creating generic type object dynamically using reflection


Type type = typeof(MessageProcessor<>).MakeGenericType(key);
That's the best you can do, however without actually knowing what type it is, there's really not much more you can do with it.
EDIT: I should clarify. I changed from var type to Type type. My point is, now you can do something like this:
object obj = Activator.CreateInstance(type);
obj will now be the correct type, but since you don't know what type "key" is at compile time, there's no way to cast it and do anything useful with it.

Invoking Generic Methods Using Reflection


This is by no means any detailed post on how to use reflection. The other day I had the need to use reflection to call a generic method. So after playing around with reflection for few minutes I figured it out.  Here is how the code looks like.

namespace ConsoleApplication7
{
    class Printing
    {
        public void PrintAnyThing(T print)
        {
            Console.WriteLine(print);
        }
    }
 
class Program
{
    static void Main(string[] args)
    {
        Type type = typeof(Printing);
        Object instance = Activator.CreateInstance(type);
        MethodInfo genericmethod = type.GetMethod("PrintAnyThing");
        MethodInfo closedmethod = genericmethod.MakeGenericMethod(typeof(string));
        closedmethod.Invoke(instance, new object[]{"Zeeshan"});
 
    }
}
}
Here is how the generic method looks like.
image
Here is how you would invoke it.
image
The generic method is pretty simple. I am taking a parameter of type T which makes it a generic method. I simply print that generic parameter value to the console as the method name states.
In the order to call the generic method, I first create an instance of Printing class by calling Activator.CreateInstance passing in type of object I want to instantiate. The reason I am creating an instance of Printing type is because PrintAnyThing generic method is an instance method. If the method would have been static I do not need to create an instance of it. Next from the type, I try to get method info for PrintAnyThing. Notice at this point it is still a generic method and I cannot invoke it directly. I need to convert it to closed method by specifying the value for T which I do by making a call to MakeGenericMethod. Once I have the closed method, I pass in the instance on which this method is to be invoked along with the method arguments that the method requires.

суббота, 12 января 2013 г.

ASP.NET MVC: Using jQuery AutoComplete UI with WEB API

Last week when I was conducting a MVC training with one of my clients, I was asked about some possible ways to implement auto-complete in ASP.NET MVC Views, similar to what we have in Google Search or the AJAX Extender. My solution was to use Query UI. You can get this free library from www.jquery.com and www.jqueryui.com. If you use Visual Studio for your development, you can use the respective Nuget Packages to get the dependencies installed via Nuget.

For this article, the Sql Server Database server is used with ‘Company’ as database and ‘EmployeeInfo’ as the table. The script is as below:

CREATE TABLE [dbo].[EmployeeInfo](

    [EmpNo] [int] IDENTITY(1,1) NOT NULL,
    [EmpName] [varchar](50) NOT NULL,
    [Salary] [decimal](18, 0) NOT NULL,
    [DeptName] [varchar](50) NOT NULL,
    [Designation] [varchar](50) NOT NULL,
CONSTRAINT [PK_EmployeeInfo] PRIMARY KEY CLUSTERED
(
    [EmpNo] ASC
)WITH (PAD_INDEX = OFF, STATISTICS_NORECOMPUTE = OFF,
IGNORE_DUP_KEY = OFF, ALLOW_ROW_LOCKS = ON, ALLOW_PAGE_LOCKS = ON)
ON [PRIMARY]
) ON [PRIMARY]

GO

Step 1: Open VS2012 and create a MVC application. Name it as ‘MVC_jQuery_AutoComplete’. In this project, add the model for the above table using Ado.NET EF. After completing the wizard for ADO.NET, the entity will be displayed as below:

employee-schema

Step 2: Build the Project. Now to add a WEB API Controller, right- click on the controller folder and add the new WEB API controller based upon the ADO.NET EF. This will generate Read/Write API Actions as below:

add-controller

This step will add a new WEB API class with Read and Write methods. These methods perform communication using JSON.

Step 3: In the project, add a new empty EmployeeInfoController. This controller will only have the Index method. We are doing this so that we can add a new Empty Index View.

Step 4: Add a new Index Empty view in the project by right clicking on the Index method of the EmployeeInfoController class. In this View, add the HTML control as below:

Enter The Employee Name Here:


Step 5: In the Scripts folder add below script files, these you can get from www.jquery.comand www.jqueryui.com.
  • jquery-1.8.2.js
  • jquery-ui-1.9.0.js
  • jquery-ui-1.9.0.min.js
In the CSS folder, add the following file:
  • jquery-ui-1.9.0.custom.css
Step 6: Refer these files in the Index.cshtml as below:


Step 7: Write the below style in the Index.cshtml, this defines the appearance for the Auto-Complete:


Step 8: Add the following script shown here. This makes an AJAX call to the WEB API (your port may be different), the JSON data is received and then it is converted into an Array. This array is then passed to the source parameter of the autocomplete method defined for the textbox.


Step 9: Run the application and navigate to the EmployeeInfo/Index, you will see the textbox. Add some text into it. If it matches with the data returned from the WEB API call, it will be displayed in the AutoComplete area as below:

auto-complete-demo

Conclusion 

Ideally we should restrict the number of rows returned to Top 10 or 20 results for performance considerations. It’s pretty easy to use the jQuery UI plugin and add AutoComplete behavior to a text box. Overall jQuery UI is a powerful tool kit to have in one’s web development portfolio. 

Download the entire source code 

Custom Validation for Cascading Dropdownlist in MVC Razor


This article will demonstrate, how to make and validate cascading dropdown list with in Asp.Net MVC4 Razor application using custom server-side and client-side validation. In this article, you will learn how set selected value with in Dropdown list in MVC Razor.

How to do it..

Follow the following steps for making and validating cascading dropdown list in mvc razor.

Step 1 : Design Model

  1. using System;
  2. using System.Collections.Generic;
  3. using System.Linq;
  4. using System.Web;
  5. using System.ComponentModel.DataAnnotations;
  6. using System.Web.Mvc;
  7. using System.Text.RegularExpressions;
  8. namespace Mvc4_Validate_CascadingDropdown.Models
  9. {
  10. public class RegistrationModel
  11. {
  12. [Required(ErrorMessage = "Please Enter Email Address")]
  13. [Display(Name = "UserName (Email Address)")]
  14. [RegularExpression(".+@.+\\..+", ErrorMessage = "Please Enter Correct Email Address")]
  15. public string UserName { get; set; }
  16. [Display(Name = "Country")]
  17. public Country Country { get; set; }
  18. [Display(Name = "City")]
  19. public City City { get; set; }
  20. [Required(ErrorMessage = "Please Enter Address")]
  21. [Display(Name = "Address")]
  22. [StringLength(200)]
  23. public string Address { get; set; }
  24. }
  25. // IClientValidatable for client side Validation
  26. public class MustBeSelectedAttribute : ValidationAttribute, IClientValidatable
  27. {
  28. public override bool IsValid(object value) {
  29. if (value == null || (int)value == 0)
  30. return false;
  31. else return true;
  32. }
  33. // Implement IClientValidatable for client side Validation
  34. public IEnumerable GetClientValidationRules(ModelMetadata metadata, ControllerContext context)
  35. {
  36. return new ModelClientValidationRule[]
  37. {
  38. new ModelClientValidationRule { ValidationType = "dropdown", ErrorMessage = this.ErrorMessage } };
  39. }
  40. }
  41. public class Country
  42. {
  43. [MustBeSelectedAttribute(ErrorMessage = "Please Select Country")]
  44. public int? ID { get; set; }
  45. public string Name { get; set; }
  46. }
  47. public class City
  48. {
  49. [MustBeSelectedAttribute(ErrorMessage = "Please Select City")]
  50. public int? ID { get; set; }
  51. public string Name { get; set; }
  52. public int? Country { get; set; }
  53. }
  54. }

Step 2: Design View based on Model

  1. @model Mvc4_Validate_CascadingDropdown.Models.RegistrationModel
  2. @{ ViewBag.Title = "Validating Cascading Dropdownlist";
  3. }
  4. Custom Validation for Cascading Dropdown List
  • @using (Html.BeginForm())
  • {
  • Custom Validation for Cascading Dropdown List
    1. @Html.LabelFor(m => m.UserName)
    2. @Html.TextBoxFor(m => m.UserName, new { maxlength = 50 })
    3. @Html.ValidationMessageFor(m => m.UserName)
    4. @Html.LabelFor(m => m.Country)
    5. @Html.DropDownListFor(m => m.Country.ID, new SelectList(ViewBag.Country, "ID", "Name", ViewBag.SelCountry), new { style = "width:310px" })
    6. @Html.ValidationMessageFor(m => m.Country.ID)
    7. @Html.LabelFor(m => m.City)
    8. @Html.DropDownListFor(m => m.City.ID, new SelectList(ViewBag.City, "ID", "Name", ViewBag.SelCity), new { style = "width:310px" })
    9. @Html.ValidationMessageFor(m => m.City.ID)
    10. @Html.LabelFor(m => m.Address)
    11. @Html.TextAreaFor(m => m.Address, new { maxlength = 200 })
    12. @Html.ValidationMessageFor(m => m.Address)
    13. type="submit" value="Submit" />
    14. }
    15. Design Controller Based on Model & View

      1. using System;
      2. using System.Collections.Generic;
      3. using System.Linq;
      4. using System.Web;
      5. using System.Web.Mvc;
      6. using Mvc4_Validate_CascadingDropdown.Models;
      7. using System.Text.RegularExpressions;
      8. namespace Mvc4_Validate_CascadingDropdown.Controllers {
      9. public class HomeController : Controller {
      10. #region Private Methods
      11. void BindCountry() {
      12. List lstCountry = new List
      13. {
      14. new Country { ID = null, Name = "Select" },
      15. new Country { ID = 1, Name = "India" },
      16. new Country { ID = 2, Name = "USA" } };
      17. ViewBag.Country = lstCountry;
      18. }
      19. //for server side
      20. void BindCity(int? mCountry) {
      21. try {
      22. if (mCountry != 0)
      23. {
      24. //below code is only for demo, you can pick city from database
      25. int index = 1;
      26. List lstCity = new List{
      27. new City { Country = 0, ID=null, Name = "Select" },
      28. new City { Country = 1, ID=index++, Name = "Delhi" },
      29. new City { Country = 1, ID=index++, Name = "Lucknow" },
      30. new City { Country = 1, ID=index++, Name = "Noida" },
      31. new City { Country = 1, ID=index++, Name = "Guragon" },
      32. new City { Country = 1, ID=index++, Name = "Pune" },
      33. new City { Country = 2, ID=index++, Name = "New-York" },
      34. new City { Country = 2, ID=index++, Name = "California" },
      35. new City { Country = 2, ID=index++, Name = "Washington" },
      36. new City { Country = 2, ID=index++, Name = "Vermont" }, };
      37. var city = from c in lstCity
      38. where c.Country == mCountry || c.Country == 0
      39. select c;
      40. ViewBag.City = city;
      41. }
      42. else {
      43. List City = new List {
      44. new City { ID = null, Name = "Select" } };
      45. ViewBag.City = City;
      46. }
      47. }
      48. catch (Exception ex) {
      49. }
      50. }
      51. #endregion
      52. //for client side using jquery
      53. public JsonResult CityList(int mCountry) {
      54. try {
      55. if (mCountry != 0) {
      56. //below code is only for demo, you can pick city from database
      57. int index = 1;
      58. List lstCity = new List{
      59. new City { Country = 0, ID=null, Name = "Select" },
      60. new City { Country = 1, ID=index++, Name = "Delhi" },
      61. new City { Country = 1, ID=index++, Name = "Lucknow" },
      62. new City { Country = 1, ID=index++, Name = "Noida" },
      63. new City { Country = 1, ID=index++, Name = "Guragon" },
      64. new City { Country = 1, ID=index++, Name = "Pune" },
      65. new City { Country = 2, ID=index++, Name = "New-York" },
      66. new City { Country = 2, ID=index++, Name = "California" },
      67. new City { Country = 2, ID=index++, Name = "Washington" },
      68. new City { Country = 2, ID=index++, Name = "Vermont" }, };
      69. var city = from c in lstCity
      70. where c.Country == mCountry || c.Country == 0
      71. select c;
      72. return Json(new SelectList(city.ToArray(), "ID", "Name"), JsonRequestBehavior.AllowGet);
      73. }
      74. }
      75. catch (Exception ex) {
      76. }
      77. return Json(null);
      78. }
      79. public ActionResult Index()
      80. {
      81. return View();
      82. }
      83. public ActionResult CustomDropdown()
      84. {
      85. BindCountry();
      86. BindCity(0);
      87. return View();
      88. }
      89. [HttpPost]
      90. public ActionResult CustomDropdown(RegistrationModel mRegister)
      91. {
      92. if (ModelState.IsValid)
      93. {
      94. return View("Completed");
      95. }
      96. else
      97. {
      98. ViewBag.SelCountry = mRegister.Country;
      99. BindCountry();
      100. ViewBag.SelCity = mRegister.City;
      101. if (mRegister.Country != null)
      102. BindCity(mRegister.Country.ID);
      103. else
      104. BindCity(null);
      105. return View();
      106. }
      107. }
      108. }
      109. }

      How it works..

      It's time to run the project and let's see the result as shown below :
         
      What do you think?
      I hope you will enjoy the tricks while programming with MVC Razor. I would like to have feedback from my blog readers. Your valuable feedback, question, or comments about this article are always welcome.