вторник, 25 мая 2010 г.

Timer vs DispatcherTimer


Windows.Forms.Timer uses the windows forms message loop to process timer events. It should be used when writing timing events that are being used in Windows Forms applications, and you want the timer to fire on the main UI thread.
DispatcherTimer is the WPF timing mechanism. It should be used when you want to handle timing in a similar manner (although this isn't limited to a single thread - each thread has its own dispatcher) and you're using WPF. It fires the event on the same thread as the Dispatcher.


In general, WPF==DispatcherTimer and Windows Forms==Forms.Timer.
That being said, there is also System.Threading.Timer, which is a timer class that fires on a separate thread. This is good for purely numerical timing, where you're not trying to update the UI, etc.

вторник, 11 мая 2010 г.

HOWTO: Creating an Uninstall Shortcut for an InstallScript MSI Project


As a general rule, Microsoft expect you to uninstall MSI applications from the Add/Remove Programs tool in the Control Panel.
Sometimes however, its nice to add a Start->Programs Menu – ‘Uninstall Shortcut’ to facilitate this action, for user convenience.
The following post details adding such a shortcut to a simple MSI build in Visual Studio 2008.


Browse to the MSI project folder (using Windows Explorer), right click and select New->Shortcut from the context menu. In the Create Shortcut Wizard dialog that pops up type ‘%windir%\system32\msiexec.exe -x {prodCode} ‘ as the location of the shortcut, where prodCode is the Product Code of the MSI package.
create_shortcut_uninstallerproduct_code_uninstaller
This Product Code can be identified from the Project Properties of the MSI Project in Visual Studio. Also, provide a proper name for the shortcut (such as Uninstall “product”, where “product” is the name of the application) and click Finish.
The next step involves adding this shortcut to the User’s Programs Menu folder of the MSI project in Visual Studio. The problem is that files with extension .lnk (extension of the shortcut) cannot be added to the Project.
First we need to rename the shortcut extension from .lnk to .txt. Open up a DOS command window and browse to the location of the shortcut using the ‘cd’ command. Remember to Run as Administrator if you are using Vista!
command_rename_uninstalleruser_programs_uninstaller
Now type ‘ren uninstall.lnk uninstall.txt’ where “uninstall” is the name of the shortcut item. Simply add the renamed shortcut into the User’s Programs Menu folder of the MSI project in the same manner as you would add any other file (Right Click > Add > File). Then in Visual studio Rename the shortcut from .txt back to .lnk and your done.
Build the MSI project and the necessary setup files will be created in the bin folder of the project. Once run the uninstall shortcut will appear in the program menu.

суббота, 8 мая 2010 г.

Installing Windows SharePoint Services on Windows 7 / Vista


Windows SharePoint Services (WSS) is not supported on a client operating system, but that’s not to say it shouldn’t run – right? After all, Windows client releases include a web server and can run a database service – that should pretty much cover the basics (back in the days of Windows NT it was generally reckoned that the differences between the Workstation and Server releases were just a few registry entries – but even if that was true then, there are a few more differences today)! In response to this, the guys at Bamboo Nation came up with an installer for SharePoint on Vistaand, even though it’s been around for a while (thanks to Garry Martin for alerting me to this), last week I finally got around to trying it out on Windows 7.


It seems to work well but, having never installed SQL Server 2008 Express Edition (WSS needs access to a SQL database) I needed to combine two very good resources (the Jonas Nilsson’s installation guide for Windows SharePoint Services 3.0 SP1 on Windows Vista and Symantec’s article on installing and configuring SQL Server 2008 Express) – the result is my installation notes (repeated in full here in case either of those articles ever disappears but for screen shots, refer to the originals – or to Jim Parshall’s video tutorial):
  1. Gather together all the resources that will be required. Assuming that Windows is already running, the remaining components are:
  2. Install and configure SQL Server 2008 Express Edition:
    • SQL Express may be downloaded with or without tools – I went for the “without” option but the tools may be useful for troubleshooting purposes. If you’re installing on an older platform, there are some pre-requisites (.NET Framework 3.5 SP1Windows Installer 4.5 and Windows PowerShell 1.0) but my Windows 7 client already had these (or later versions).
    • Run the SQL Server Express installer and follow the wizard. It’s fairly straightforward but there are a couple of things to watch out for:
      • For the instance configuration, specify MSSQLSERVER as both the named instance and the instance ID.
      • For the server configuration, use NT AUTHORITY\SYSTEM (no password) as the SQL Server database engine account name and set the SQL Server Browser startup type to Automatic.
      • For database engine configuration, either Windows or mixed mode authentication may be used (I stuck with the defaults) but the installer will not continue until users or groups are specified for unrestricted access to the SQL server. SQL DBAs and security guys will probably have lots of best practice advice here for use with production servers but I took the view that it’s probably nothing too much to worry about on a developer workstation and simply gave the necessary rights to the account I was running as.
  3. Install and configure Internet Information Services in Control Panel, Programs and Features by clicking the option to turn Windows features on or off and enabling:
    • Internet Information Services
      • Web Management Services
        • IIS 6 Management Compatibility
          • IIS 6 Management Console
          • IIS 6 Scripting Tools
          • IIS 6 WMI Campatability
          • IIS 6 Metabase and IIS 6 configuration capability
        • IIS Management Console
      • World Wide Web Services
        • Application Development Features
          • .NET Extensibility
          • ASP.NET
          • ISAPI Extensions
          • ISAPI Filters
        • Common HTTP Features
          • Default Document
          • Directory Browsing
          • HTTP Errors
          • HTTP Redirection
          • Static Content
        • Health and Diagnostics
          • HTTP Logging
          • Request Monitor
        • Performance Features
          • HTTP Compression Dynamic
          • Static Content Compression
        • Security
          • Basic Authentication
          • Request Filtering
          • Windows Authentication
  4. Install the WSS on Vista setup helper application by running wssvista.msi.
  5. Install WSS by:
    • Locating the WSS on Vista helper application files in %programfiles%\WSSonVista\Setup and running setuplauncher.exe.
    • Pointing the setuphelper to the WSS installer (sharepoint.exe)
    • Following the WSS installation wizard, selecting an advanced installation for a web front-end server, creating a new server farm, and supplying the details for the local SQL database (including the account details).
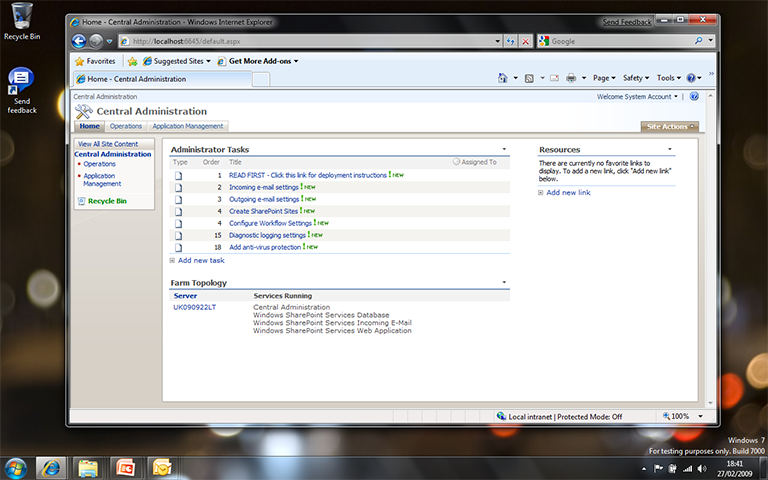
  6. At the end of the WSS installation, take a note of the port number used, and then navigate to http://localhost:portnumber/. If all goes well, then you should see the SharePoint Central Administration site in your browser:
    Windows SharePoint Services running on Windows 7
Finally, a couple of additional notes:
  • I ran all of this as a standard user, answering just a few UAC prompts at the appropriate points to elevate my privileges).
  • These instructions will allow access to SharePoint site from the local machine; however it will be necessary to create some firewall exceptions if remote client access is required.

Hot to turn off the application compatibility engine in Windows 7


 To turn off the application compatibility engine you need to:
  1. Run GPEdit.msc
  2. This should open the Local Group Policy Editor
  3. In the tree (on the left) select Local Computer Policy then Computer Configuration,Administrative TemplatesWindows Components and finally Application Compatibility
  4. Locate the entry for Turn off Application Compatibility Engine and double click on it
  5. Select the Enabled radio button and then click OK
  6. Next locate the entry for Turn off Program Compatibility Assistant and double click on it
  7. Select the Enabled radio button and then click OK


You should now have something that looks like this:
picture3
Now you will need to reboot your computer (forcing a group policy update is not enough in this case). 

четверг, 6 мая 2010 г.

Store update, insert, or delete statement affected an unexpected number of rows (0)


Store update, insert, or delete statement affected an unexpected number of rows (0). Entities may have been modified or deleted since entities were loaded. Refresh ObjectStateManager entries.


This exception is letting you know that no rows were updated. There are several reasons why you may encounter this error.
One simple reason is that when attaching entities to an Object Context, you need to use the AddObject() method if the entity is newly created (and doesn't have an Entity Key), whereas you can use the Object Context Attach() method if the entity already exists and is being updated. Here is some code to demonstrate this (where "EntityContainerName" is the name of your Entity Framework container and "EntitySetName" is the name of the Entity Set to which you are adding the entity):
if (entity.EntityKey == null || entity.EntityKey.IsTemporary)
{
   this.ObjectContext.AddObject("EntityContainerName.EntitySetName", entity);
}
else
{
   this.ObjectContext.Attach(entity);
}

Note that you need to be careful when adding entities that are related to other entity objects because Object Services attempts to add the related objects too.

Инструкции по обновлению, вставке или удалению из хранилища затронули непредвиденное число строк (0)


Инструкции по обновлению, вставке или удалению из хранилища затронули непредвиденное число строк (0). Сущности могли быть изменены или удалены с момента их загрузки. Обновите записи диспетчера ObjectStateManager.


Это исключение говорит о том что не было обновлено не одной строки. В моем случае это произошло из-за того что я забыл добавить в таблицу поле Id. И Entity Framework просто не знала какие записи нужно обновить.

понедельник, 3 мая 2010 г.

Обзорный сценарий командной работы в Visual Studio Team System 2010

Описание доклада
Серьезные проекты в одиночку не создаются. А создаются они в команде. Но где команда, там и очевидные проблемы, которые начинаются с самых банальных вопросов. Когда приступать к работе? Какую задачу выполнять сегодня? В каком модуле писать код? Что тестировать? Где тестировать? Каков прогресс по проекту в целом? Вопросы хоть и простые но, тем не менее, требующие организационного подхода. А там где процессы всегда найдется возможность автоматизации. Конечно, в рамках часового доклада сложно рассказать о такой масштабной теме. Тем не менее, в данном докладе рассматривается основной обзорный сценарий взаимодействия ролей разработчика, тестировщика, менеджера, архитектора проекта, а так же то, как с помощью средств Visual Studio 2010 они могут взаимодействовать друг с другом.


Отличия Microsoft WSS 3.0 и Microsoft Office SharePoint Server 2007


Пользователей, знакомых со службами Microsoft Windows SharePoint Services, может интересовать, как они связаны с Office SharePoint Server 2007. Windows SharePoint Services — это базовая технология, которая включена в Microsoft Windows Server 2003. Она обеспечивает производительность и взаимодействие групп благодаря предоставлению доступа к людям, документам и данным, необходимым для принятия обоснованных решений и эффективного выполнения работы. Office SharePoint Server 2007 основывается на технологии Windows SharePoint Services 3.0, обеспечивая знакомую и единообразную среду для списков и библиотек, администрирования и настройки узлов. Все возможности, доступные в Windows SharePoint Services 3.0, также доступны в Office SharePoint Server 2007.
Однако в Office SharePoint Server 2007 предлагаются расширенные и дополнительные возможности, которые отсутствуют в Windows SharePoint Services. Например, Office SharePoint Server 2007 и Windows SharePoint Services включают шаблоны узлов для совместной работы и подготовки собраний. Однако Office SharePoint Server 2007 включает ряд дополнительных шаблонов узлов, соответствующих различным потребностям предприятий и сценариям публикации.


В следующей таблице представлен краткий обзор возможностей, доступных в Windows SharePoint Services 3.0 и в выпусках Office SharePoint Server 2007 Standard Edition и Office SharePoint Server 2007 Enterprise Edition. Чтобы прочитать полное описание возможностей Microsoft Office SharePoint Server 2007 и Windows SharePoint Services 3.0, загрузите таблицу сравнения продуктов (XLS-файл, 168 КБ). Дополнительные сведения об этой универсальной технологии см. на веб-узле TechNetWindows SharePoint Services 3.0 (EN).

суббота, 1 мая 2010 г.

Using window.onload event


Some scripts require that you run something immediately after the web page finishes loading. The normal way to do this is to add an onload attribute to the body tag. You don't have to do it that way though, you can set up a global event handler to do it instead.
Why would you want to use a global event handler instead of just adding the code into the body tag? I can think of two reasons. Firstly by using a global event handler you make it easier to add the code to web pages because you don't have to edit the body tag, if you add the script into an existing external Javascript file attached to your page you may not need to edit the page at all. Secondly some web editors may limit your ability to add code easily to the body tag.


Example

  1. window.onload = function() {  
  2.   init();  
  3.   doSomethingElse();  
  4. };  
  1. <html>  
  2. <head>  
  3.   
  4. <title>onload testtitle>  
  5.   
  6. <script type="text/javascript">  
  7.   
  8. window.onload = load;  
  9.   
  10. function load()  
  11. {  
  12.  alert("load event detected!");  
  13. }  
  14. script>  
  15. head>  
  16.   
  17. <body>  
  18. <p>The load event fires when the document has finished loading!p>  
  19. body>  
  20. html>